David Ott

Oct 182019
 

Update 10/29/19: Added search (username/userfullname) to the Sessions tab.

Studio always seems extremely sluggish to me when trying to navigate between different areas. I’m always waiting a few seconds for the refresh circle to go away every single time I navigate somewhere new.

Most of the time I just need to put a machine in/out of maintenance, perform a power action, or logoff/disconnect a session. I found that power shell is MUCH faster, so I wrote a new little tool.

Requirements:
.net 4.5
The broker admin powershell snapin (available on the install media -alternatively you can run this on the delivery controller itself and use localhost as the connection string)

You can select each server/desktop/session individually, or select multiple. Then simply right click and select the operation to perform. I have tested this on versions 7.15 through 1906. Note: There is no warning! When you select the action to perform it will just do it.
Here is the download link
https://david62277.sharefile.com/d-sd0c6f7690ce436ba

Operations allowed (depending on state):
Machines – turn on/off maintenance, shutdown, restart, reset, poweroff
Sessions – Disconnect, Log Off

Jul 292019
 

Update: Added cli functionality.
Update: Added 2nd pass of defrag to fix the profile ballooning issue that sometimes occurs.
Update: Added ability to target profiles over “X” size for compacting
Update 3/31/2020: Fixed a bug that didn’t allow the new tool to run as a scheduled task. Fixed in version 2003.1
Update 4/21/2020: Fixed bug that didn’t assign drive letters to vhd(x) files when running via CLI. Which breaks the defrag, and in turn doesn’t free up any space for diskpart to shrink. Fixed version is 2004.1.
Update 4/23/2020: Added the ability to sort profiles in the GUI. Clicking the stop button should dismount vhd(x) files automatically. Uses optimize-volume instead of defrag – should be MUCH faster. Also does not need drive letters anymore. Version 2004.2
Update 4/27/2020: Tool now detects RW disks and will not attempt to compact multi session profile disks if in use. Version 2004.4
Update 4/29/2020: Tool will find hidden .vhd(x) files. Version 2004.5
Update 5/26/2020: Fixed the optimize-volumes to use “retrim” after defraging the volume. This will increase processing time, but shrink the vhd(x) files much more. Version 2005.1

Update 6/24/2020: Added defrag back – which seems to do a lot better at freeing up space. Instead of giving a drive letter it sets the drive up as a mount point in the TEMP directory of the user running it (random named folder that will start with “_FSL”). With this I have updated the command line so you can process more than one vhd(x) at a time. TAKE NOTE OF THE NEW COMMAND LINE OPTIONS AS THEY HAVE CHANGED! Version 2006.1
UPDATE 6/25/2020: Bug fix – the 2006.1 version would leave the last vhd(x) attached when using the -tasks # switch. No, popups in cli to stop processing if it doesn’t find any vhd(x), and instead of “N/A” it will show the file size if the file is locked in the after column. Fixed in version 2006.3.
Edit: Version 2006.4 now – last bug fix for the day hopefully. Forgot to add the check for RW.VHD(X) files.

Do not use this tool if you are doing any differencing disks!
Diff disks, no problem!

This post is an updated version of my original profile compacting script ( https://www.citrixirc.com/?p=829). I wrote it using Powershell Studio and converted it into an executable. This version does not require the Hyper-V powershell module as it diskpart to perform the shrink function.

Requirements:

  1. Administrative rights on the machine running the tool, and read/write to the profiles.
  2. .Net 4.5
  3. Recommend not running from a machine which has any .vhd(x) attached

Instructions/How it works:

  1. The program will remember the last directory selected (via an .ini file – if it exists), or you can click the “…” button at the top left to browse to the root directory of your profile share.
  2. Once a directory is selected it will list all .vhd and .vhdx files along with their current size and their current locked status in descending order by size. (this can take a little while depending on how many vhd(x) files are present – be patient)
  3. Select the profile(s) you wish to compact (you can select multiple using ctrl and shift+click)
  4. Click the compact button, and the program will process each profile selected one at a time
    1. Checks one more time to make sure the file is not locked
      1. If it is, it will skip on to the next one
    2. Gets the current size again before processing
    3. Attaches the vhd(x) in R/W mode
    4. Creates a random named folder in the user’s temp directory starting with “_FSL”
    5. Mounts the vhd(x) to that folder
    6. defrags the volume
    7. Detaches and re-attaches as read only
    8. Uses diskpart to compact the vhd(x)
    9. Gets the size of the file post processing
    10. Updates the results pane
  5. After it has run through all the selected profiles it will display the total reduction in MB at the bottom.
  6. Update: To run via CLI simply run from command prompt with the following options
    -path \\servername\share (path to the root vhd(x) share)
    -size 4096 (minimum size to touch in MB – will skip any vhd(x) smaller)
    -tasks # (number of concurrent vhd(x) files to compact – there is no limit, so be careful not to overload the machine you’re running this on)

    Examples:
    Run against all vhd(x) files one at a time
    ShrinkFSL.exe -path \\servername\share\

    Run against all vhd(x) files 2 at a time
    ShrinkFSL.exe -path \\servername\share -tasks 2

    Run against all vhd(x) files over 5GB
    ShrinkFSL.exe -path \\servername\share -size 5120

    Run against all vhd(x) files over 5GB AND process 2 at a time
    ShrinkFSL.exe -path \\servername\share -size 5120 -tasks 2
    1. A log file in csv format will be generated in the same directory that ShrinkFSL is run from. Shrink_MMddyyy_HHmmss.log
    2. If you stop the process make sure you disconnect any vhd(x) file that may be lingering, and delete _FSL folders in the temp directory!

You can keep track of the .vhd(x) attaching/detaching via diskmgmt.msc if you want. If for some reason the program hangs up you can click the stop button. It will detect if there is a vhd(x) attached, and detach it.

Always test new tools in Development/UAT environments prior to running in production! If you have any questions/comments please post here, and I will respond as soon as I can.

Here is a link to the tool (Updated 6/25/2020)
https://david62277.sharefile.com/d-saad8432c8994f61b

Dec 202017
 

In my environment I have nearly 100 persistent MCS VDAs. Our developers, contractors, and even us IT people need the ability to change things on our VDI desktops (install/uninstall/set registry/create local IIS sites/etc.) and have them persist reboots. Luckily, the only software I have to maintain on these desktops is the VDA itself. That still means when Citrix releases a new version that I want to move to, I have to upgrade almost 100 individual desktops. The last time I had to do this I wanted to rip my hair out, and decided to write a script to automate the task. It has saved me TONS of time, so I want to share it in hopes that it can save someone else some time (and hair).

I wrote the script specifically for my MCS environment, which runs on XenServer, but with a little tweaking it can be modified for any environment.

How it works (the short version):

  1. Gets the computer(s) you set – can be manual input or a delivery controller query
  2. On each computer it will create 2 scripts, and 2 scheduled tasks
    1. The first script loads auto logon info into the registry
    2. The second script handles the vda removal and install
  3. One scheduled task runs once to run the first script and reboot
  4. The second scheduled task runs the second script at logon (first script sets up a user – in my case the local administrator – to logon automatically)

Most things are explained in the script, and this time I’ve also created a youtube video to go through it all/show it in action.

Script
Video


Oct 242017
 

NOTE: This only works between like profile versions.  eg. You can’t migrate your 2008R2 profiles to Server 2016 and expect it to work.  See this chart.

I moved from UPM to FSLogix earlier this year, and decided to write my own powershell script to convert the UPM profiles to .vhd.  FSLogix has its own conversion process (which I didn’t find a whole lot of info on), but I decided to create my own.

What this script does:

  1. Gets a list of all UPM profile directories in the root path (that you supply) and displays them to you to select which one(s) you would like to convert via out-gridview
  2. For each profile you select:
    1. Gets the username from the profile path – you will have to edit this part for your environment… explanation in the script
    2. Use the username to get the SID (FSLogix profiles use the username and sid to name the profile folder)
    3. Creates the FSLogix profile folder (if it doesn’t exist)
    4. Sets the user as the owner of that folder, and gives them full control
    5. Creates the .vhd (my default is 30GB dynamic – edit on line 70 if you wish to change it) – if it doesn’t exist (if it does skip 7, 9-10)
    6. Attaches the .vhd
    7. Creates a partition and formats it ntfs
    8. Assigns the letter T to that drive (edit on line 73 if you wish to change that)
    9. Creates the T:\Profile directory
    10. Grants System/Administrators and the user full control of the profile directory
    11. Copies the profile from the UPM path to the T:\Profile directory with /E /Purge – if you are re-running this script on a particular profile it will overwrite everything fresh
    12. Creates T:\Profile\AppData\Local\FSLogix if it doesnt exist
    13. Creates T:\Profile\AppData\Local\FSLogix\ProfileData.reg if it doesn’t exist (this feeds the profilelist key at logon)

Here is the script!

Aug 252017
 

(See the new tool Here)

I recently switched from Citrix Profile Management to FSLogix! For those of you who do not know how it works… it mounts a virtual hard drive at the C:\Users\%UserName% folder for each user who connects. A huge advantage to this is that it is not copying the profile in at logon (or out at logoff), which greatly reduces logon times. Depending on how you have things setup you can literally (not figuratively) expect logon times of around 15 seconds reported in director no matter how your users decide to bloat their profiles.

There is one “problem” with dynamic vhd/vhdx profiles… they don’t shrink on their own. For instance, if you were to copy a 4GB file into a dynamic vhd file you would obviously see it grow by about that much. If you delete that 4GB file the vhd stays the same size! This isn’t really that big of a deal to me, but it might be to my storage administrator.

I wrote a script to compact the vhd profiles not in use.

Requirements:
Windows 10 – Powershell v5
Hyper-V module (Enable-WindowsOptionalFeature -Online -FeatureName Microsoft-Hyper-V -All) – reboot required
Powershell run as Administrator

What this script does:

  1. Checks to make sure the above requirements are met
  2. Loads functions and variables (you will have to edit some of them for your environment – see the script for more info)
  3. Gets a list of all vhd/vhdx files in the root of your profile share
  4. Runs a for each loop
    1. Tests to see if the vhd file is currently locked (in use)
      1. If yes it will display a message on your screen saying it is locked and that it is being skipped (in the report the Success column will be marked with locked)
      2. If no then it will move on
    2. Tries to mount the vhd in read only mode
      1. If it fails it will send you an alert email and end the script as something is not right
      2. If it mounts then the script moves on
    3. Tries to optimize the vhd file (compact)
      1. Gets the original size in MB, size after compact in MB, computes the total reduction in MB, and notes failure/success
    4. Tries to dismount the vhd
      1. If it fails it will send you an alert email and end the script
  5. Once finished it will email you a report like the one below (names, paths, and sids are masked obviously)

Here is the script

Apr 032017
 

Original Post

The first script I wrote was from before Citrix added real powershell functionality into PVS.  This new script leverages the new powershell module.  I am not exactly sure when they first added this into PVS (if you know please comment below), but this was developed using PVS 7.12.  Pay attention to comments marked with multiple hash tags (####) – these are places you will need to edit the script to fit your enviroment.

Here is the new script

Mar 312017
 

Problem:
In my environment I have about 300 provisioned desktops, and when I update the vDisk sometimes it can take a while (days) before all of the VMs get the latest version.  Especially, in the case of a roll back I need a good way to get all of the VMs which are on the wrong version (and are waiting for a session) to boot to the correct version.

Solution:
POWERSHELL!!
Requirements:
I think powershell version 3, but since I did it with v4 I’ll say 4+
PVS powershell module installed (learn more here)
Powershell remoting enabled on your delivery controller (also need to supply the name in the script)

What the script does:

  1. Gets a list of the Collections in your PVS environment, and outputs it to out-gridview so you can select the collection you want to focus on
    1. If you hit cancel the script ends
  2. After your select the collection and hit ok it will get all of the devices in that collection which are powered on, and cannot access a maintenance/private disk image
  3. For each of the devices in that list it checks to see if they have the latest vDisk version, or if they have the correct OverRide version.
    1. If they do then it tells you the device is on the correct version, and moves on to the next device
    2. If they do not then it will pass the device name to the check function, and after moves on to the next device
      1. invokes powershell on the delivery controller to see if the VM is in use (powershell remoting required)
        1. If it is, it tells you it is in use and does nothing
        2. If it is not it will reboot the vm, and tell you

Here is the script!  Remember to test it before using it in a production environment.


Feb 092017
 

I recently ran into an issue after upgrading my XenDesktop environment to 7.12 from 7.11.  Prior to that update I was able to create MCS desktops in my XenServer pool with no issues.  After upgrading to 7.12 the newly created VMs would not register with the delivery controller, and according to XenServer they did not have the tools installed.  I found that the network card didn’t even appear in Network Connections, and in device manager it showed up as a Realtek adapter instead of the XenServer PV device it should have.

After further investigation I found that the new VMs were created missing some things in XenServer if compared to VMs which were working (xe vm-list name-label=<name of vm> params=all).  I posted on discussions.citrix.com to see if anyone had run into this issue before, and Carl Stalhood pointed me to this post.

Apparently, there is a private hotfix that will correct the problem, but it requries you do delete/re-create the machine catalog (which shows as the answer to the problem on the thread).  Reading through the post Paul Browne gives a much better/easier solution:
“Also in the short term to get your VM`s working correctly.

Shutdown the VM
putty or console into the XenServer

xe vm-list

(find UUID of the Vm you wish to fix)

xe vm-param-set has-vendor-device=true uuid=<UUID of the VM>

It should now work as expected.”

I wrote this PowerShell script to perform the operation, that Paul gives above, automatically across multiple VMs.  Requires Powershell v3, scripts enabled (set-executionpolicy to change it), and XenCenter to be installed on the machine the script is run from.  Read the comments of the script to see an explanation of what the script is doing.

Dec 052016
 

Background

Using Citrix Profile Management with profile streaming enabled should keep your logon times pretty low.  Recently, they updated the version of our Antivirus (Trend Micro) to the latest, and suddenly I started seeing desktops fail with “session prepare failure” errors.  After much investigation it had something to do with the behavior monitoring feature of the AV software hanging Citrix Profile Management long enough to cause the desktop to freeze/unregister.  Turning off the profile streaming option fixed that issue.

Since then I have noticed logon times have skyrocketed.  I used to see an average logon time of about 30 seconds, and after disabling profile streaming I see average times well over 1 minute (some individuals as high as 5 minutes).

In order to try to get our logon times back down to a reasonable time I wrote a script to investigate the profile store.  I found a few folders which contain a ton of files – files that have to be copied in at each logon slowing things down.

The Fix

I wrote a blog post a while back about using a Powershell Script to redirect folders via symbolic links.  You can find that here https://www.citrixirc.com/?p=315.   We can use that same method to redirect “bad” folders, but using Citrix Workspace Environment Management instead (no need to learn how to script!).  NOTE: Users must have the “Create symbolic links” right!

Instructions

Of course, you are going to need WEM setup in your environment.  Carl Stalhood has a great step by step on how to set it up here http://www.carlstalhood.com/workspace-environment-manager/.

A couple of caveats I would add to his blog post:
If you are installing on a PVS image before shutting down your maintenance/private mode vdisk to re-seal, kill the Norskale Agent Host Service.  For whatever reason if you don’t do this it can cause your vms in standard mode to take an obscenely long time to shutdown.
If you have a PVS environment and you have redirected the WEM cache to the persistent drive use a startup task to refresh the cache, force restart the Norskale Agent Host Service, and start netlogon after.  If the cache doesn’t already exist WEM doesn’t seem to check with the WEM server.  You have to create the cache, and then restart the service so that it reads it, and force restarting the Norskale Agent Host Service will stop netlogon (dependent on it).  Chicken or the egg thing…

Assuming you have WEM setup and running:

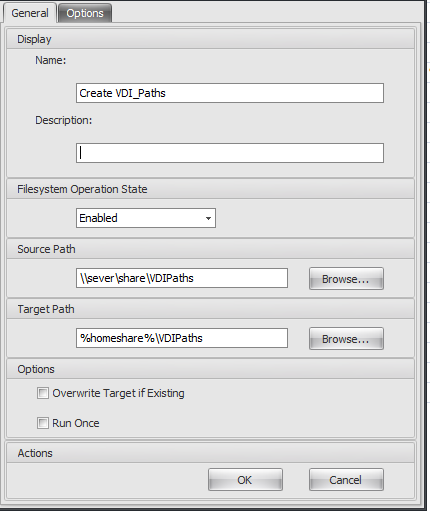
Create a Folders and Files action that creates the redirected folder structure in the user home directory or where ever you want to put it.  In the \\server\share\VDIPaths (or whatever you name it) have the folder structure laid out for all the folders you wish to redirect (empty folders) – this is your folder “template” directory:
ie: \\server\share\VDIPaths\Recent
\\server\share\VDIPaths\IELocal\DOMStore
\\server\share\VDIPaths\GoogleChrome\Googlelocal
etc.

The source path is the folder you just created and the target is where you want to put it.  Make sure overwrite target if existing and run once are unchecked
120516_1959_UsingCitrix1.png

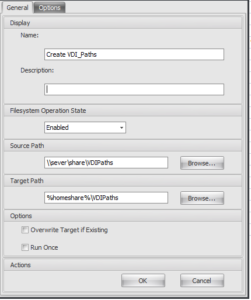
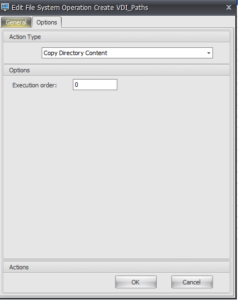
Under Options – Copy Directory Content (creates the folder structure in the user’s %homeshare% folder or where ever you put it), and make sure the Execution order is “0” – happens first.
120516_1959_UsingCitrix2.png

Next we need to perform 3 tasks for each folder you want to redirect to the user %homeshare%\VDIPaths folder (or where ever you decide to put it)

We will first move the existing data in the profile to the redirect location, second delete the existing data in the profile, and finally create the symbolic link.
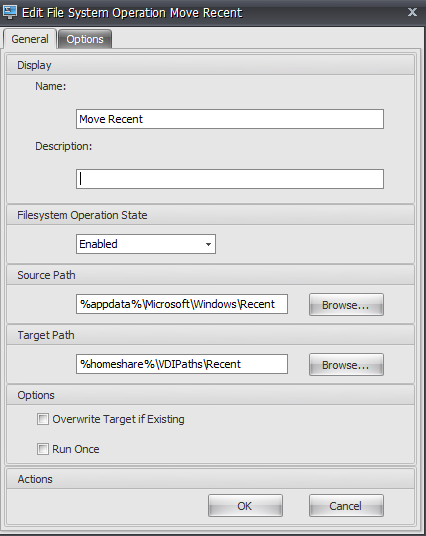
Move

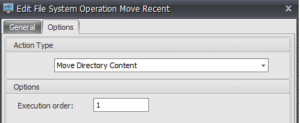
The first thing we do is create the move operation.  Name it whatever you want.  The source is the local profile path to the user, and the target is where we want to move the files
120516_1959_UsingCitrix3.png

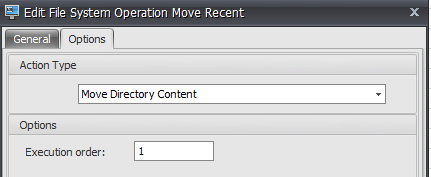
Under the Options Tab select Move Directory Content and set the execution order to 1.  We want the “VDIPaths\Recent” folder to have been created already by the create task
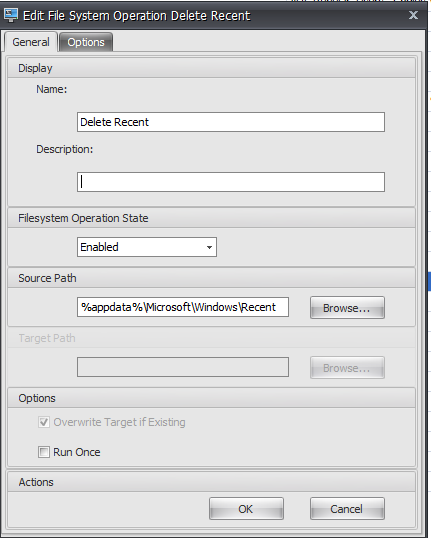
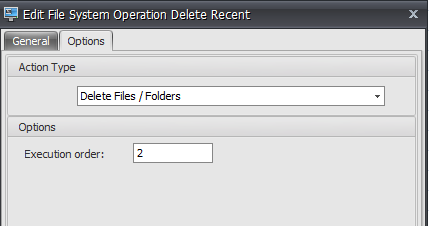
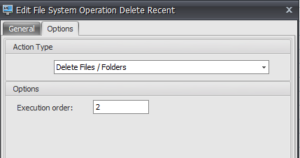
120516_1959_UsingCitrix4.png

Delete

Set the source path to the directory you want to delete
120516_1959_UsingCitrix5.png

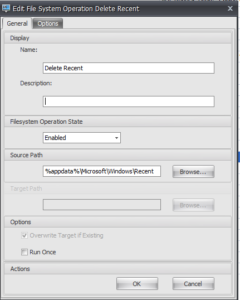
Under the Options Tab select Delete Files / Folders and set the Execution order to 2 as we want the files to be moved to the new location prior to deleting.
120516_1959_UsingCitrix6.png

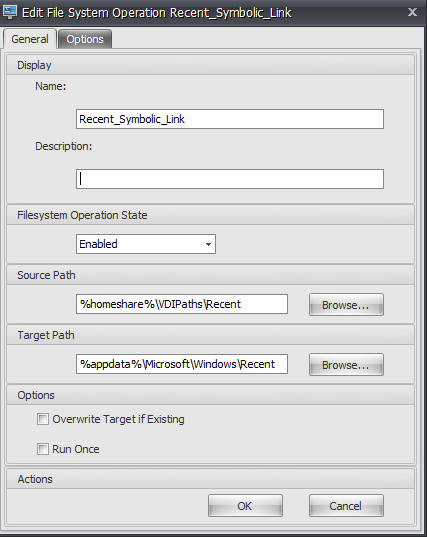
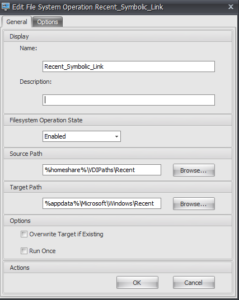
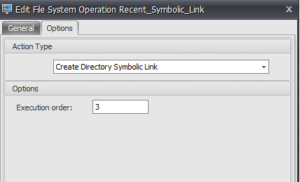
Create the Symbolic Link

The Source will be the %homeshare% location, and the target will be the local profile path location.
120516_1959_UsingCitrix7.png

Under the Options tab set the action to Create Directory Symbolic Link and set the execution order to 3.
120516_1959_UsingCitrix8.png

Assign tasks

Assuming you have already setup configured users you can now assign the 4 tasks above to your test user or group.  Going forward you will only need to create the latter 3 tasks, and just make sure you update the “template” directory accordingly.

Assign the first task (create VDI_Paths in my case) setting always true
Assign the second task (Move Recent in my case) setting always true
Assign the third task (Delete Recent in my case) setting always true
Assign the 4th task (Recent_Symbolic_Link in my case) setting always true
120516_1959_UsingCitrix9.png

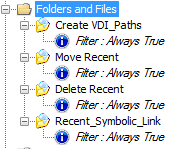
0 – Create VDI_Paths – copies the folder structure to the user’s %homeshare% directory
1 – Move Recent – moves the contents of %appdata%\Microsoft\Windows\Recent to %homeshare%\VDIPaths\Recent
2 – Delete Recent – deletes the %appdata%\Microsoft\Windows\Recent folder
3 – Recent_Symbolic_Link – Creates a symbolic link at %appdata%\Microsoft\Windows\Recent pointing to %homeshare%\VDIPaths\Recent

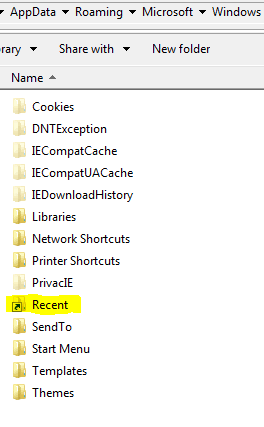
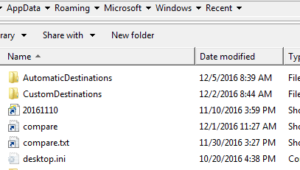
You end up with something that looks like this:
120516_1959_UsingCitrix10.png

If you click into the Recent symbolic link you will see it still looks like it is on the local C: drive as far as the path goes, but it is “redirected” to the path you specified.  If it does not work check the Norskale Vuem Agent.log file in the user profile, and look for the error.  If it is a permissions issue, then you probably have to allow the user to create symbolic links via gpo and/or local policy (I put it both places just to be sure it takes).
120516_1959_UsingCitrix11.png

I have done this for the following paths thus far with success

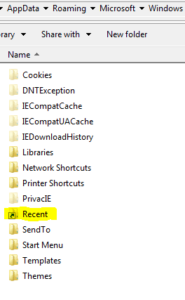
%appdata%\Microsoft\Windows\Recent – all the recent places/docs a user has opened
%appdata%\Microsoft\Signatures – Outlook signatures
%localappdata%\Apps\2.0 – This one is for clickonce apps – I also had to make another task to create the “Apps” folder in the local profile in case it doesn’t exist (only one that is different from the rest)
%localappdata%\Microsoft\Internet Explorer\DOMStore – some IE cache that gets quite large
%appdata%\Microsoft\Office\Recent – all recent Office docs
%localappdata%\Google – Chrome cache
%appdata%\Mozilla – Firefox cache
%localappdata%\Mozilla – Firefox cache
%localappdata%\Apps\Evernote – Evernote (unfortunately some of my users need this)
%localappdata%\WebEx – WebEx Cache

Once you are certain all of the existing data for each of your users has been moved to their %homeshare% directory (or where ever you put it) you can exclude those folders from UPM, and remove the Move/Delete tasks.  It won’t hurt to leave them though…

Jul 252016
 

As in my previous post we are querying the Citrix monitordata tables in SQL instead of doing web queries against ODATA because it is super fast.

The script needs to run as a user who has at least read rights to the database.  Just like the original it will query the monitordata tables to gather the information, but I think I have improved on the queries a bit.  Also, just like the original it gets a lot more information than what is actually needed, so the queries can be used again for other information (logon duration reporting, accessing outside vs inside report, client version reports, etc.).  Feel free to edit and use this script as you see fit.

Here is the updated script!  Pay attention to anything marked with multiple hashes (####).  It is referencing something you need to change for your environment (ie: sql server name), or items of note.

Here is an example of the updated report.

Report