EDIT: People have been requesting a tool to deploy SMS2 secret keys en mass, and the developer hasn’t implemented it yet. Until he does I wrote a powershell script that will remotely connect to the sql database and inject the information needed for each user you select (http://pastebin.com/NBJHJPsX). I have it setup for TOTP keys… which I think is what most people will use.
EDIT2: I created a new script that does basically the same thing as the script posted above, but you can direct it against a specific AD group (http://pastebin.com/L9D8Jwaf). Also, if you haven’t yet – upgrade your netscalers to version 11 – much easier to control the portal themes.
Get SMS2
Go to http://www.wrightccs.com/ and register for your free copy – an email will be sent to you with a download link and your xml based license.
Prepare your environment
You will need SQL/SQLExpress if you don’t already have it (will assume you do). You also need .NET 4 on the RADIUS server (will assume you have that too).
1. On the server you wish to use for RADIUS authentication open server management and click Add Roles and Features
2. Install the Network Policy and Access Services role and add any features that go along with that role – accept all the defaults.


3. Open the Network Policy Server Console
a. Expand Policies and select Network Policies
b. Right click Connections to other access servers and select properties
c. Change it from Deny access to Grant access and hit ok

d. Expand RADIUS Clients and Servers
e. Right click RADIUS Clients and select New
f. Create a connection for the local computer (so you can test connections).
Friendly name – whatever you want to name it
Address – the IP address of the RADIUS server you are creating
Shared secret – type something in that you will remember (will need it later)
Hit OK

g. Do the same thing for your Netscaler(s) using the NSIP(s) – again remember your shared secret – if you have more than one Netscaler use the same shared secret.
Should look something like this when you are done

4. Install SMS2
a. Next
b. For my purposes I select Custom (I don’t want SMS based authentication – just token)
i. Services I set CloudSMS to not install
ii. Under Clients I set all to install but the Citrix Web Interface Customization and SMS2…
c. Configure AuthEngine – enter the license text from the email you received and hit Check License (should pop up when it expires) – click ok and then Next
d. Leave the account as Local System and hit Next
e. On the next screen change the AuthEngine Address to 0.0.0.0 (will reply on all IP addresses of the server)
Type in your domain controller name/address and fill in user account credentials of a user with access to AD
optionally you can change the BaseDN, but I’ll leave it as the root of my test domain
test your config and hit Next if successful

f. Enter your SQL server information
If the SQL instance is on the RADIUS server itself (as it is in my case) check the box to “Use named pipes (local)”
Click Test Connection – I get an error about how it could not use the database… it wasn’t there yet. I hit test connection again and it is successful.

g. Enter your email information – uncheck SSL and Use Auth if you don’t need them (straight smtp for me) – Finish

h. Configure OATHCalc – Next – Finish
i. Configure AdminGUI/Clients – Set the AuthEngine Address to the IP of the RADIUS server, and hit Finish
j. Next – install – Finish
Configure SMS2 for Token
1. Browse to C:\Program Files\WrightCCS2\Settings (assuming you installed the 64bit version… if not the Settings directory will be in x86)
2. Open Configuration.xml in notepad and change these settings (by default they are True, which will mess things up)
<AuthEnginePinCode>False</AuthEnginePinCode>
<AuthEngineChallengeResponse>False</AuthEngineChallengeResponse>
3. Find the <AuthProviders> line
a. Under CloudSMS – disable it (we didn’t install it anyways)
<Enabled>false</Enabled>
<Default>false</Default>
b. Under OATHCalc set it as default
<Default>true</Default>
c. Under PINTAN – disable
<Enabled>false</Enabled>
d. Under Email – disable
<Enabled>false</Enabled>
4. Save the .xml file and restart the WrightAuthEngine service (if they are not started – start them)
Setup all users for token (this could potentially take a long time)
1. Launch the SMS2 Admin Console
2. Select the user on the right hand side to select, and hit Configuration Menu at the top.
3. Go to the Auth Options tab (don’t need the others)

4. Click TOTP (time-based) and click Generate Shared Secret – record the shared secret if you want

5. Click Save configuration and you will see a popup – click OK and then you will see a QR code – copy it to the clipboard and send it to the user (also keep a record of it if you want)

6. Click Close
7. Do that again and again until you have a token for every user who needs to connect to XenApp/XenDesktop through the gateway
At this point users would download Google Authenticator or Microsoft Authenticator (probably others) to their smartphone and add the account using that QR code. Let’s assume everyone has done that.
TEST!!!
1. Download NTRadPing (https://thwack.solarwinds.com/thread/14486) – google it if that link doesn’t work… you will find it
2. From your RADIUS server unzip it and run it (remember we created a client connection for the local computer earlier)
Type the IP of your radius server (port is 1812 if it isn’t there by default)
Leave the reply/retries set to default
Type in your secure string that you associated with the local computer RADIUS client
Type in the domain\username of a user you have configured to use one of the authenticator apps
Type in the password followed immediately with whatever code is showing in your authenticator app. If the password is “P@ssword!” then the password would be P@ssword!456123 (where 456123) is the number generated.
Click Send – If you see Reply-Message=Message accepted then you are good to go. If not then something is wrong.

Configure Netscaler
GUI 10.5
1. Logon your netscaler and browse to Netscaler Gateway\Policies\Authentication\RADIUS
2. Click the Servers tab and click Add
Give it a name
Select Server IP and punch in the IP of the RADIUS server
Port will be 1812
Type in the secret key you used to create the Netscaler RADIUS clients on the RADIUS server

Click Details and set Accounting* to OFF
Click Create
3. Click the Policies tab and click Add
Name the policy
Select the Server you just created (if it isn’t pre-selected)
Type in “ns_true” into the Expression field and hit Create

4. Bind the policy to your Netscaler Gateway virtual server(s) (NetScaler Gateway\Virtual Servers)
Select the virtual server and hit edit
Click the + on Authentication

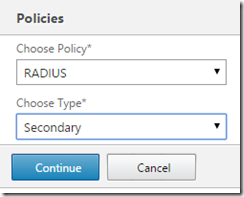
Choose RADIUS and Secondary from the drop downs and hit Continue
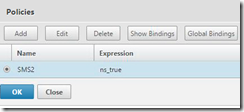
Click to select the policy

Tick the policy you just created and hit ok
Click Bind
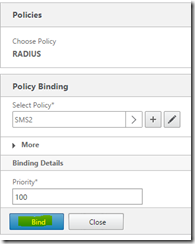
Click done and save
At this point you should be ready to test logging onto the gateway page
Testing the gateway
1. Hit your gateway address you will probably notice it has changed and looks something like this:
Password1 is your password
Password2 is your token pin
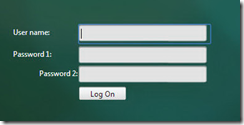
2. Logon using your credentials and the token generated by Google Authenticator (or whatever app you are using).
a. If it works then you are good to go and can move onto customizing the web interface
b. If it does not work unbind the policy and test to figure out where things are going wrong
i. Could be the wrong IP entered in for the Netscaler on the RADIUS server or wrong security string
Fixing the gateway appearance
1. Download Notepad++ and install (http://notepad-plus-plus.org/download/v6.7.5.html)
2. Download Tunnelier (http://www.bitvise.com/ssh-client-download)
3. Install and run Tunnelier (Bitvise SSH Client)
4. Connect to your netscaler using the password method
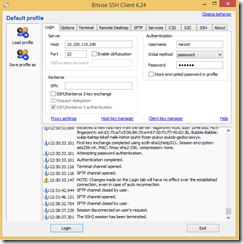
5. A command window and a SFTP window will open – select the SFTP window and on the right hand side browse to: /var/netscaler/gui/vpn
6. Select login.js and click the download button at the bottom (will download to your local desktop by default unless you change it on the left side… should be ok).
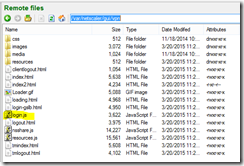
7. On the right side go into the resources folder and download en.xml
8. Make a backup copy of the files just in case
9. Open login.js using Notepad++
Find this line: if ( pwc == 2 ) { document.write(‘ 1’); }
and change it to:
if ( pwc == 2 ) { document.write(‘ ’); }
Just remove the 1 basically
Find the line that starts with: document.write(‘<TR><TD align=right style=”padding-top:
and change right to left
10. Save login.js
11. Open en.xml in Notepad++
Find this line: <String id=”Password2″>Password 2:</String>
Change it to: <String id=”Password2″>Token:</String>
You can name it whatever you want… I’m just using Token:
12. In Tunnelier upload the files to their respective directories overwriting them
13. Refresh your browser and your changes should be reflected.
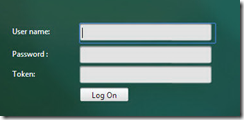
The only problem now is that this change will not survive a reboot. In older versions of netscaler you could use a rewrite policy to rewrite the page and that would persist. In 10.1+ you have to use a custom theme.
Set a custom theme so the gateway appearance persists a reboot
NOTE: Linux is case sensitive… type things exactly as I have them.
1. Using Tunnelier switch to your terminal window
Commands:
shell
cp /nsconfig/ns.conf /nsconfig/ns.conf.save
mkdir /var/ns_gui_custom
cd /netscaler
tar -cvzf /var/ns_gui_custom/customtheme.tar.gz ns_gui/*
What we did there was make a backup of ns.conf (in case something goes awry – reverse the “cp” command to restore it), created a folder, and zipped the contents of /netscaler/ns_gui to /var/ns_gui_custom/customtheme.tar.gz ß that is the file and location that netscaler knows to use for a custom theme.
2. Open your netscaler in your browser, logon and navigate to NetScaler Gateway\Global Settings
3. Click the Change Global Settings link on the right side
4. Click the Client Experience tab and scroll to the bottom
5. Switch the UI Theme to Custom and hit OK
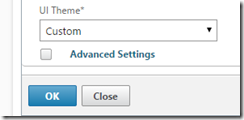
6. TEST the gateway page (I use a chrome incognito window when I make a change as it doesn’t use the cached website)
7. If the test is successful save your netscaler configuration
a. If you have a HA pair I am pretty sure you have to mirror all the steps on the secondary except for setting the UI Theme to Custom. On your secondary:
i. Copy the files to the correct locations on the secondary netscaler
ii. Run the commands from the terminal window
iii. Force a sync from the gui (System\High Availability à Actions)

