
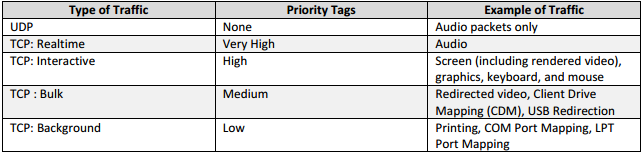
I’m not going to go into the details about what Multi-Stream ICA (MSI) is in this article. I assume you already have a basic understanding of what this is and you are really just here to figure out how to configure it. If you do not, a great Citrix blog about Multi-Stream ICA has been written up here. In a nutshell Multi-Stream ICA allows you to break out different portions of Citrix traffic into dedicated TCP ports. The basic breakdown is below:
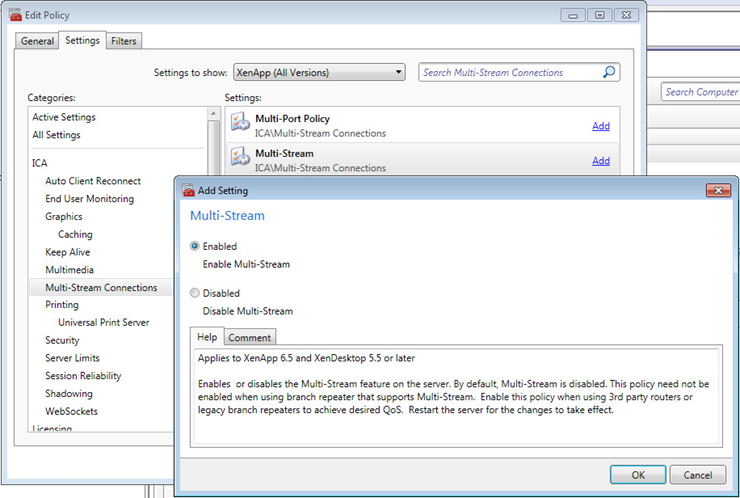
Enabling this on the Citrix side is pretty easy. We need to first enable Multi-Stream in a computer policy.
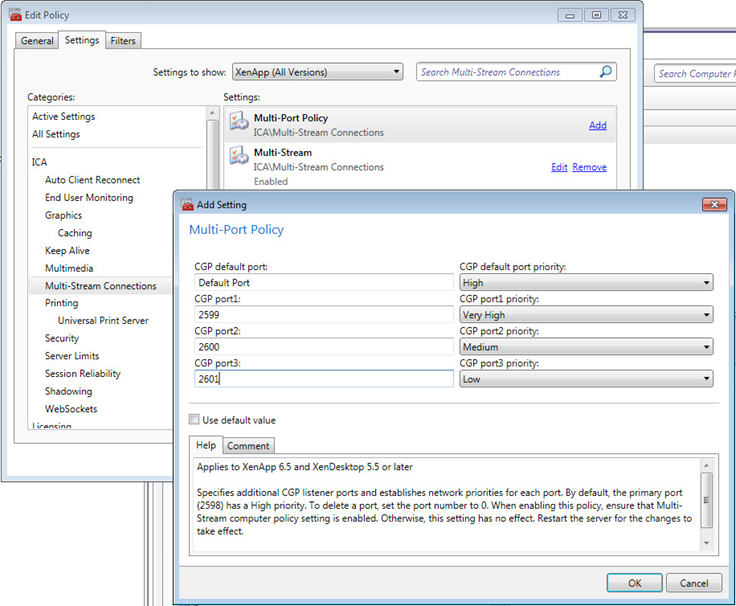
Then we need to setup the Multi-Port Policy. In this example I’m using 2599,2600,2601 for the other ports. The Default Port is the standard 2598 port for Session Reliability.
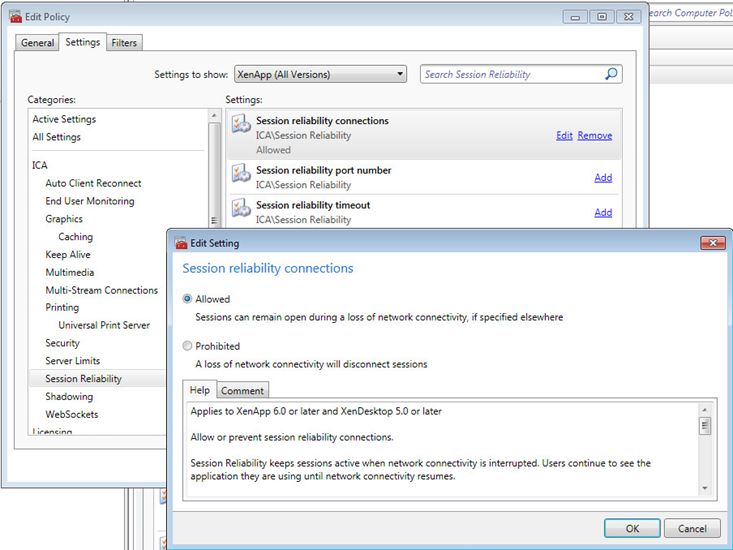
MSI requires Session Reliability to be enabled, so make sure you don’t have it disabled in a Computer Policy. I like to enable it so my other engineers know for a fact that it is enabled.
This takes care of the Citrix side. Not too much configuration there. The Cisco side gets a bit more involved. You do need to have a bit of knowledge on basic Cisco configuration and more specifically, an understanding of how QOS works, in general, and specifically how Cisco QOS works. Cisco has released an article here that talks in detail about how to implement MSI in a Cisco Enterprise environment. The Cisco document calls for mapping specific DiffServ classes to each MSI priority level. This is certainly the best practice when you want this to traverse a larger network with multiple hops. I’m going to post a simple example where you have Users—–RTR1—–RTR2—–Citrix. We will be using a 5Mbps Point to Point link between the 2 routers. In this setup we are going to define the ports, and assign bandwidth values to them.
First, you want to define the port groups. I will label these with Very High, High, Medium, Low (vh, h, m, l). All configurations need to be performed on both routers.
ip access-list extended citrix-vh
permit tcp any eq 2599 any
ip access-list extended citrix-h
permit tcp any eq 2598 any
ip access-list extended citrix-m
permit tcp any eq 2600 any
ip access-list extended citrix-l
permit tcp any eq 2601 any
Next we will define the Class-Maps.
class-map match-any citrix-vh
match access-group name citrix-vh
class-map match-any citrix-h
match access-group name citrix-h
class-map match-any citrix-m
match access-group name citrix-m
class-map match-any citrix-l
match access-group name citrix-l
Now that the variables are defined we move on to creating a queuing policy. Let’s assume we have 20 users. My main concern here is the “high” queue. At periods of congestion I want to make sure that the Screen/Keyboard/Mouse have enough bandwidth so users can continue to work and not have service degradation. Let’s say 20 users @ 50Kbps each = 1000Kbps. That’s about 25% of a 5 meg link, however we can give it a little wiggle room, so let’s bump that up to 35% (1.7Mbps). Keep in mind that this doesn’t LIMIT the bandwidth to 35%, it can use as much bandwidth as it wants until periods of congestion (link saturation) where it’s guaranteed the 35% of the bandwidth we configure. The medium and low queues which contain printing and file redirection aren’t as critical and I will set these to use 1Mbps during congestion (25%). Lastly, is the Very High queue. In my specific environments we don’t use too much audio, therefore I have set this to 15% of the link speed.
Keep in mind that your numbers and percentages will vary based on your use case and your amount of bandwidth available. Do you have a lot of users upload photos? Do you print a lot of large documents? Do you use a lot of real-time audio? You will need to evaluate your specific scenario and alter this example to fit your needs. You may also have existing QOS on your link and need to integrate this configuration. We have customers using SIP/RTP for voice on most of our links and I have integrated that into my configuration. I have removed that configuration for simplicities sake.
Here is the configuration for my policy map.
policy-map CITRIX-QUEUE
class citrix-vh
bandwidth percent 15
class citrix-h
bandwidth percent 35
class citrix-m
bandwidth percent 25
class citrix-l
bandwidth percent 25
class class-default
fair-queue
After this policy-map is configured we will need to embed this into a shaping policy to make sure the percentages line up with the available bandwidth. If you do not do this, QOS will assume the link speed of the interface which is generally 100/1000 Mbps. Obviously 25% of 100Mbps is more than the 5Mbps the link speed actually is. The below configuration will shape the bandwidth at the site to 4.9Mbps then apply the queue.
policy-map CITRIX-SHAPE
class class-default
shape average 4900000
service-policy CITRIX-QUEUE
After all is said and done you will need to apply this to the each end of the interface in an OUTBOUND direction.
interface FastEthernet4
service-policy output CITRIX-SHAPE
Make sure your configuration is working by doing a “show policy-map interface FastEthernet4”. The first example shows citrix-vh. You will want to make sure its incrementing packets under the “Match” area. You may see some drops (164), but this is normal. The second snip is class-default. If you have congestion on your link you will start to see drops on this class-map. In this example we have 143878 drops. This is a 5Mbps link and QOS is working great keeping non-critical traffic from starving my Citrix traffic.
Class-map: citrix-vh (match-any)
752287922 packets, 53798289807 bytes
5 minute offered rate 0 bps, drop rate 0 bps
Match: access-group name citrix-vh
752287923 packets, 53798290067 bytes
5 minute rate 0 bps
Queueing
queue limit 64 packets
(queue depth/total drops/no-buffer drops) 0/164/0
(pkts output/bytes output) 752287754/53798175224
bandwidth 25% (1024 kbps)
Class-map: class-default (match-any)
315951400 packets, 75108131350 bytes
5 minute offered rate 94000 bps, drop rate 0 bps
Match: any
Queueing
queue limit 64 packets
(queue depth/total drops/no-buffer drops/flowdrops) 0/143878/0/143878
(pkts output/bytes output) 315807520/74835090017
Fair-queue: per-flow queue limit 16
Hope this helps you in your Citrix Multi-Stream ICA configurations. This is a pretty basic setup, but I hope this points you in the right direction to get started using this cool newish feature. I hope to write up a blog later on how this integrates with CloudBridge and how to use MSI in conjunction with that.
This really breaks it down and makes it simple to understand. But how does this work when Secure Gateway is involved and all traffic is being delivered via port 443 (TSL v1.0) to the client machines?
Multi-Stream ICA isn’t supported through CSG or Netscaler in ICA Proxy mode. This is a configuration for traffic generally going over some sort of Point to Point connection (MPLS, Metro-E, etc.)
Im a netwok guy myself. But citrix isnt ma world unfortunately. So as I understand your post correctly, citrix is not able to mark traffic on its own? It would be great if i could set the corresponding DSCP value that should be marked for each stream in the citrix policy on the server.
We can mark the traffic on the router with DSCP32 but we want to have it marked in LAN already. Our switches cant mark the traffic.
Do you know if there is a way?
Sadly, Citrix only gives the ability to split out the channels to specific ports and not do marking itself. I like the thought though, and I see real value in it. I can reach out to them to see if it’s something they would be willing to add.