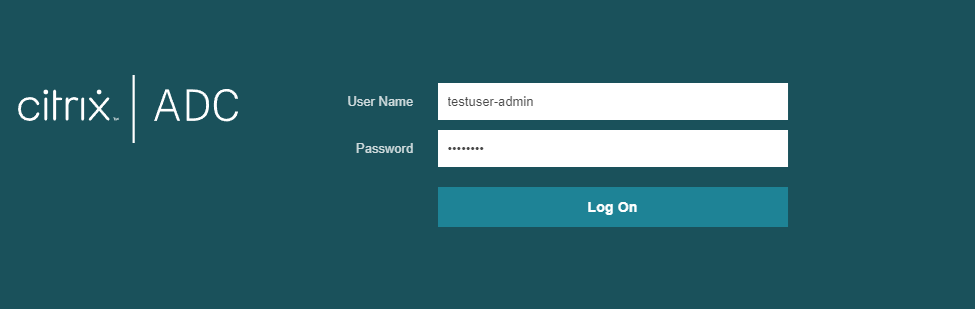
We have been putting more and more security measures in place over the years, and a new requirement was to have any administrative access to these VDAs have MFA on at the console level (and RDP). We are using Duo for this.
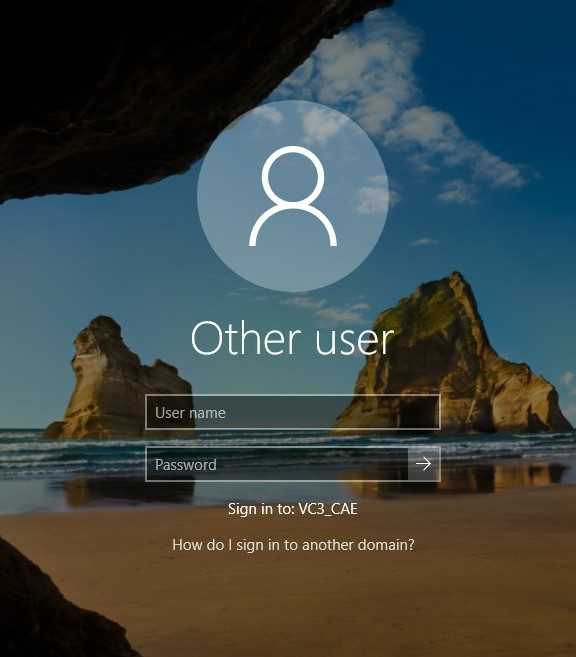
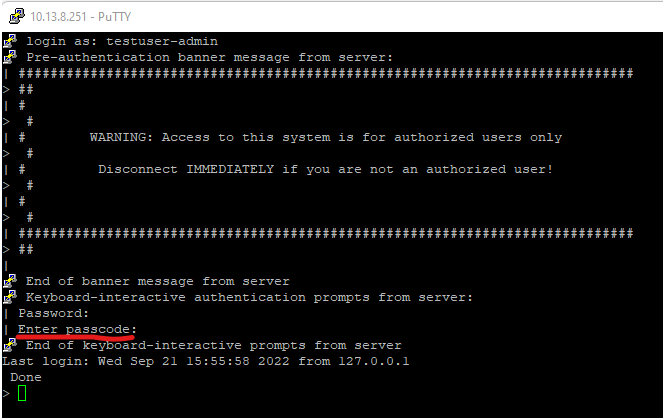
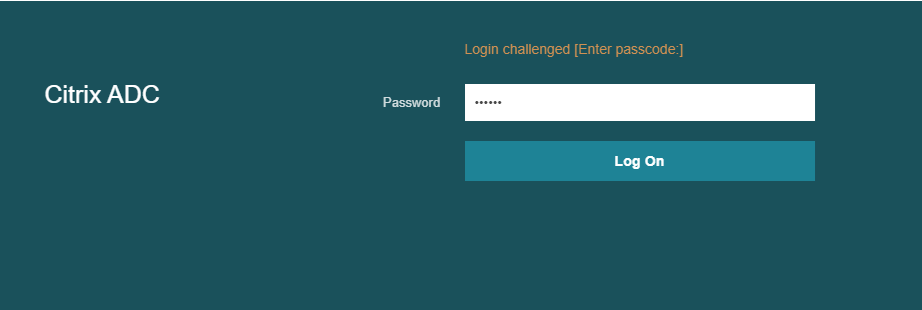
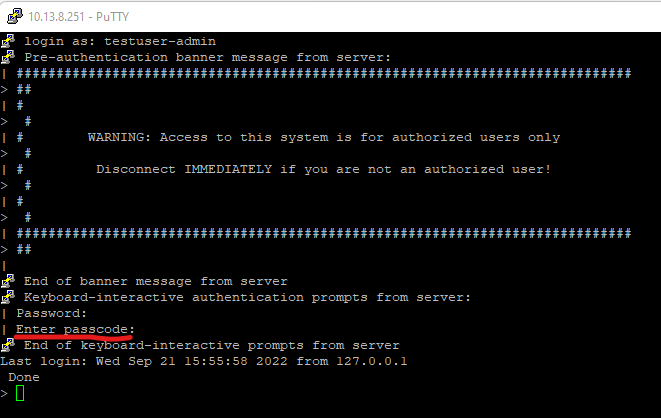
When I installed Duo, I immediately started seeing a problem. Even though I had the Duo policy set to BYPASS non-administrative users, I was still getting an extra authentication prompt upon login.
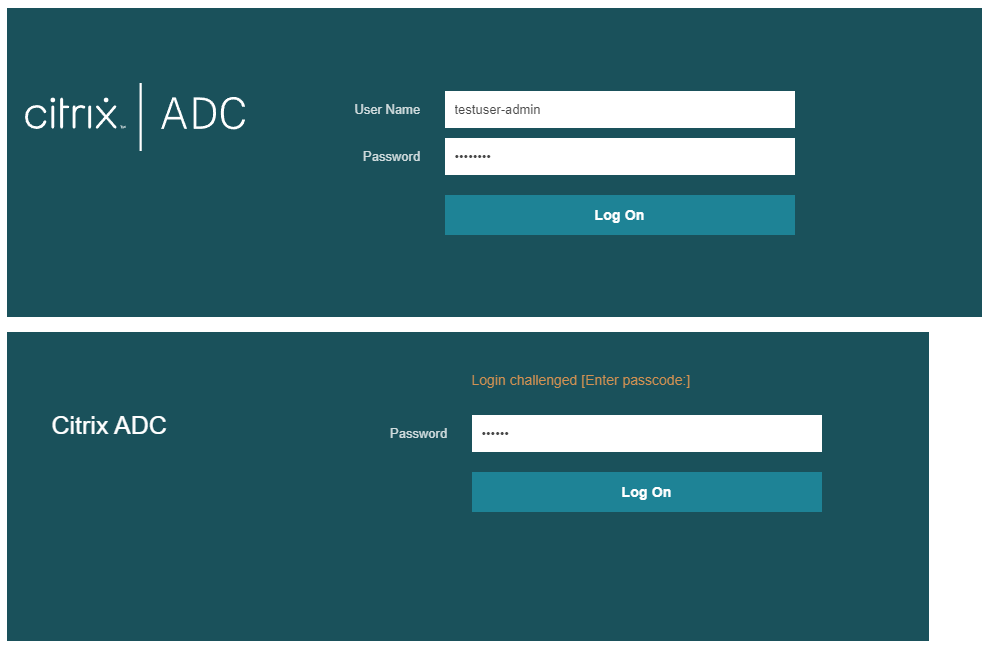
The login process looked as follows:
It was this extra authentication that was throwing me for a loop. I opened a ticket with Duo, and they were able to point me to a registry key. HKEY_LOCAL_MACHINE\SOFTWARE\Duo Security\DuoCredProv\ProvidersWhitelist – https://help.duo.com/s/article/4041?language=en_US
This was great, but the problem was there are 20 or so authentication providers. So, I tried many combinations without success. I reached out to WorldOfEUC, and of course, the amazing community came back with a hit. Dennis Parker told me to try a couple of entries. {1D7BE727-4560-4adf-9ED8-5EEC78C6ECFF} and {81C8E4DC-B376-4D88-BCCD-BD0DD65BEE2B}
In this example. We will be using Microsoft Network Policy Server (NPS) as the main Radius server. Using NPS we can setup 2 groups, which will allow us to setup read-only users (or whatever command group set you want) to login to ADC Admin portal without MFA, and forward any Admin logins to Duo Authentication Proxy to login with MFA. In this example I have NPS and Duo Authentication Proxy installed on the same server.
Duo Proxy Config
We will be using the same Duo configuration from Part 1
You will need to add the following IP/Subnet information into the authproxy.cfg file. You can edit this file by running the “Duo Authentication Proxy Manager” application. Then Validate/Save/Restart the Duo Auth Proxy
1
2
radius_ip_2=127.0.0.1
radius_secret_2=secret2
Microsoft NPS configuration
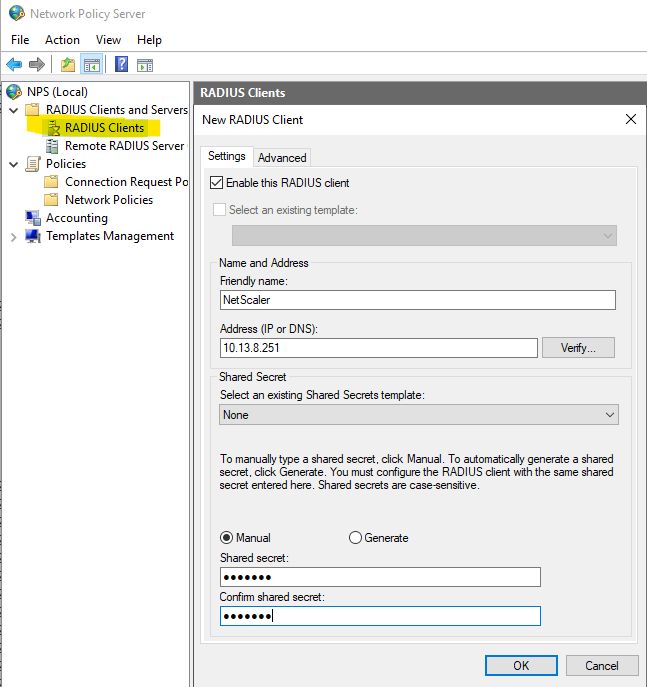
First thing we need to do in NPS is add the ADC as a Radius Client.
Radius Clients Configuration
Go into NPS, right-click “RADIUS Clients” and select New. Add the Friendly Name, IP Address (or DNS), and shared secret you want for this specific device. (Use the NSIP here) (If HA, need both NSIPs as two different devices)
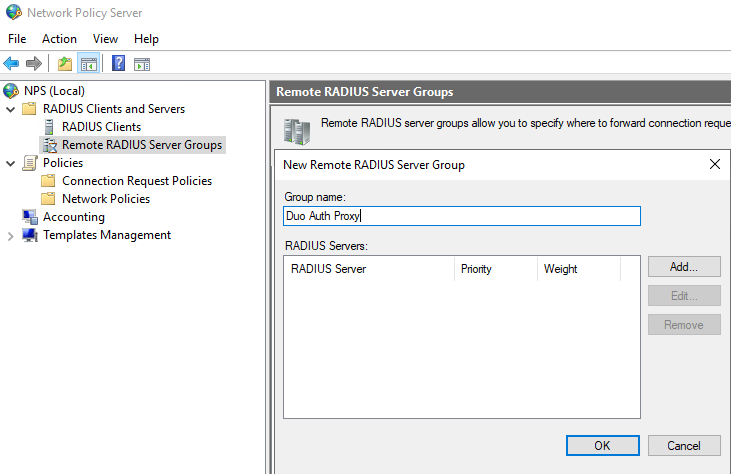
Remote RADIUS Server Groups Configuration
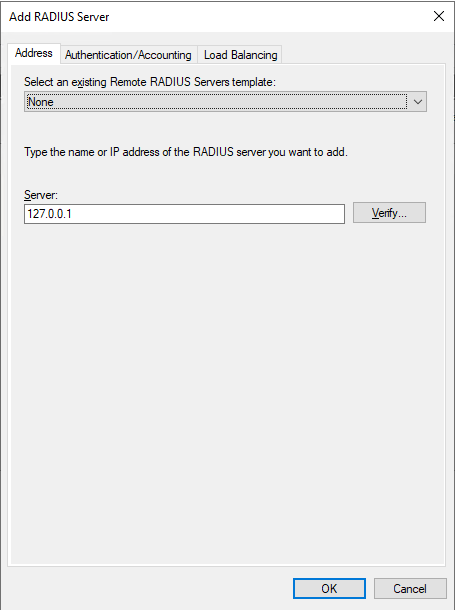
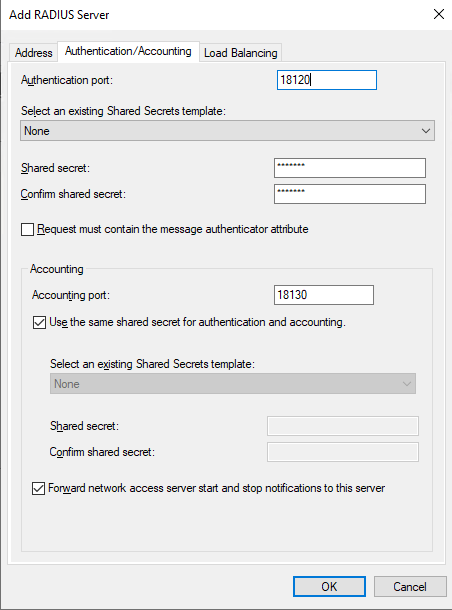
Next, right-click “Remote RADIUS Server Groups” and click “New”. Here you will first setup the Name, which is your Duo Auth Proxy. Click “Add”
You will add 127.0.0.1 as NPS and Duo are installed on the same server. Under “Authentication/Accounting”, make sure you select the port/secret you configured the Duo Auth Proxy section from Part 1 (likely 18120, as NPS is using 1812).
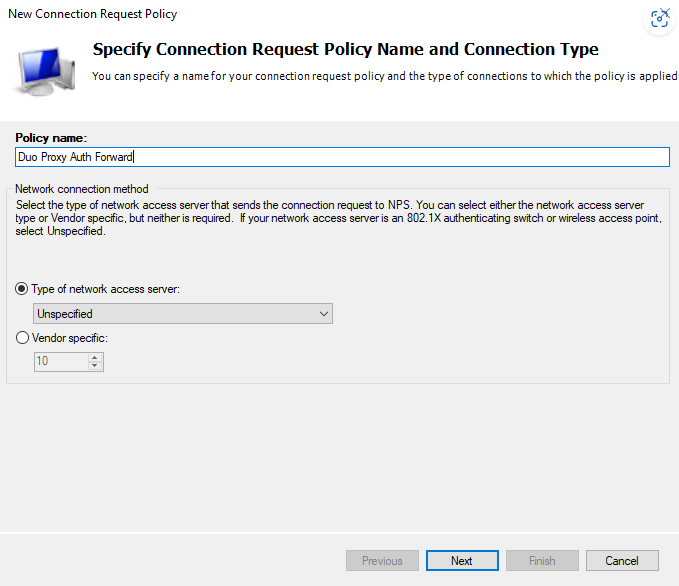
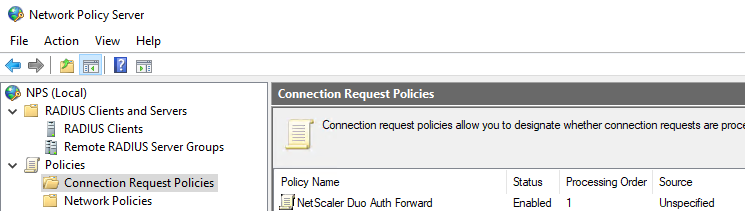
Connection Request Policy (CRP)
Right-Click “Connection Request Policies” and select “New”. Add “Duo Proxy Auth Forward” – “Connection Request Policies” will now be known as CRPs.
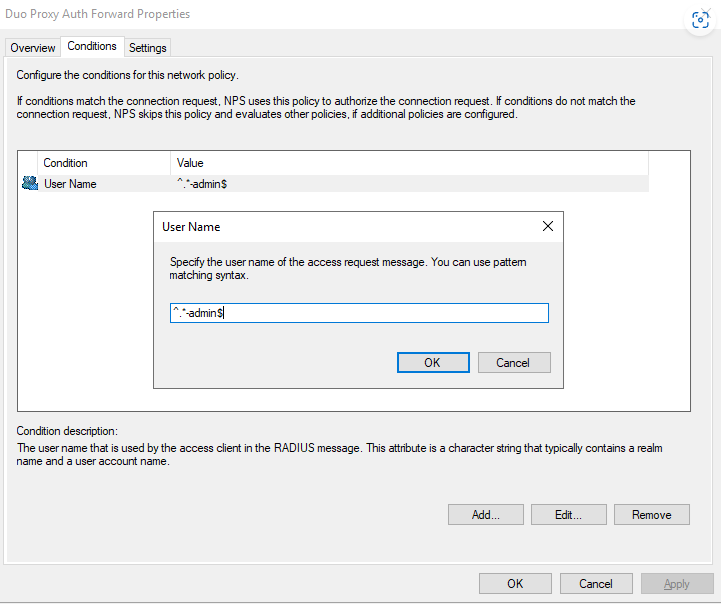
Here we can specify conditions. This is where it can get simple, or complicated, depending on your environment.
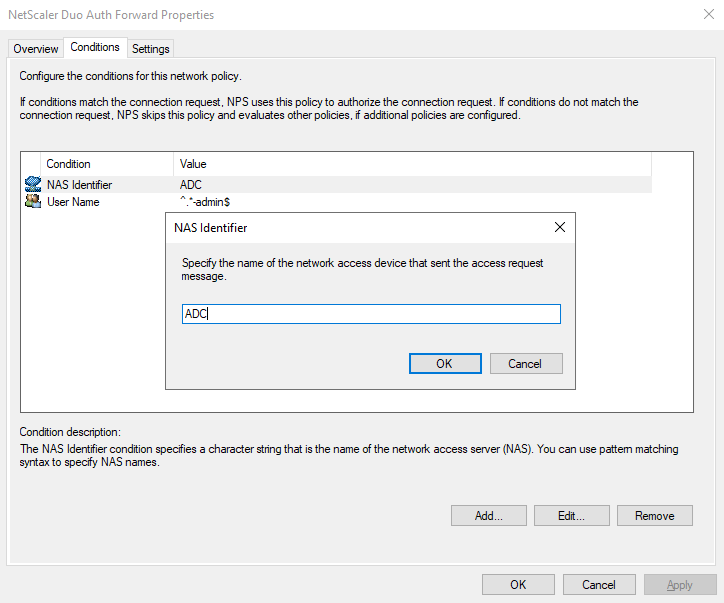
You cannot use Windows Groups to forward on a Connection Request Policy. You can, however, do username filters. You can use RegEx to specify what usernames you want to be forwarded. This example will forward all -admin users to the Duo Auth Proxy. ^.*-admin$. Enter this and hit OK, and OK. (Keep in mind that we have already locked down the Duo application to a group of users.)
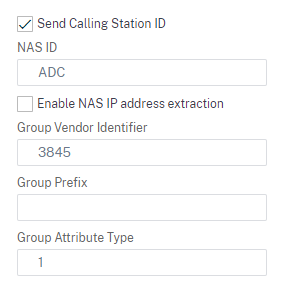
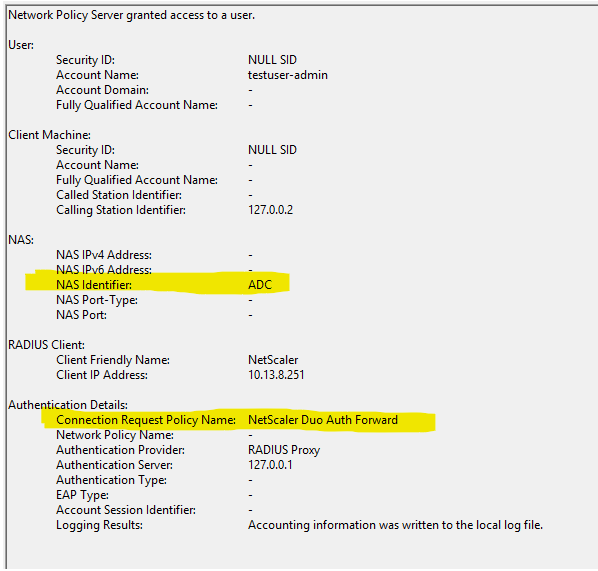
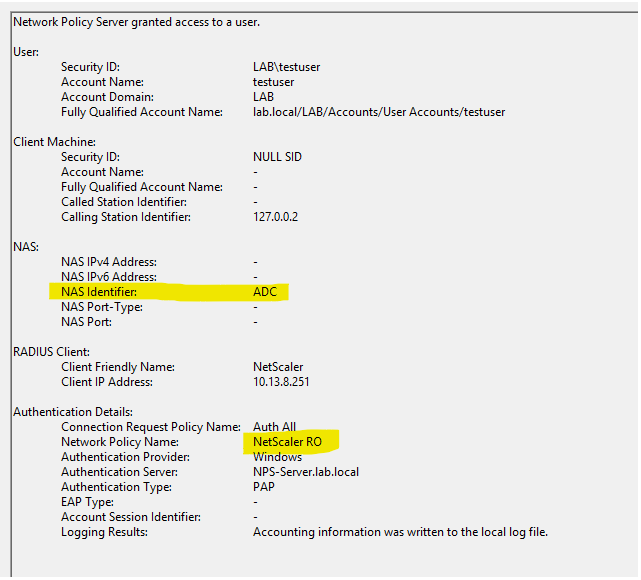
I will also be adding the “ADC” NAS Identifier we setup in Part 1.
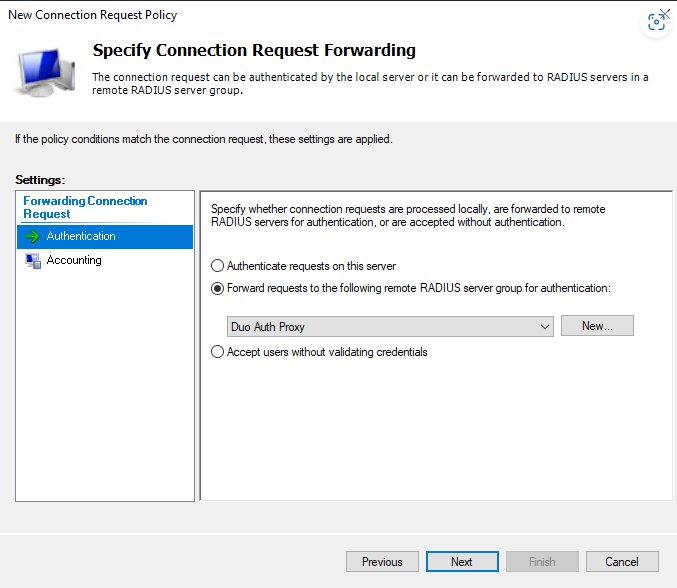
In all cases, you will then point the Authentication to the Duo Auth Proxy Remote RADIUS Server group you configured above.
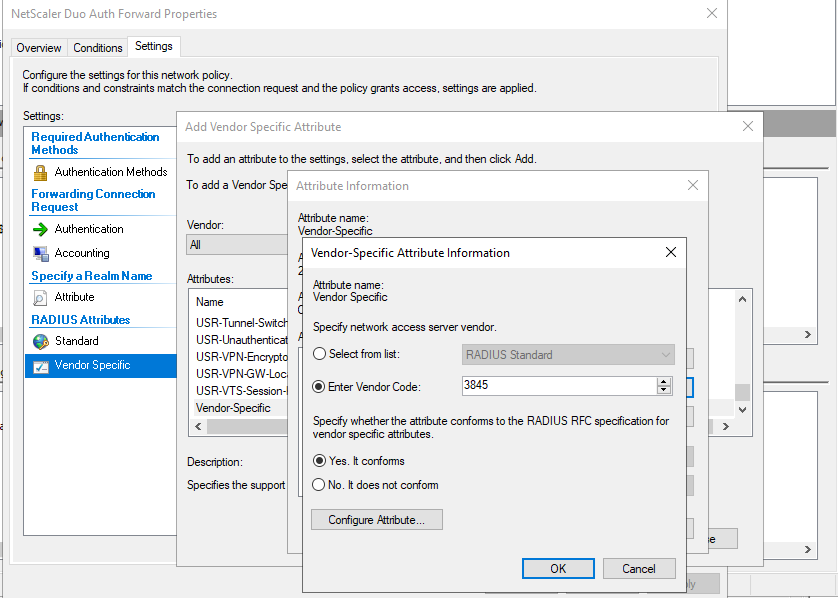
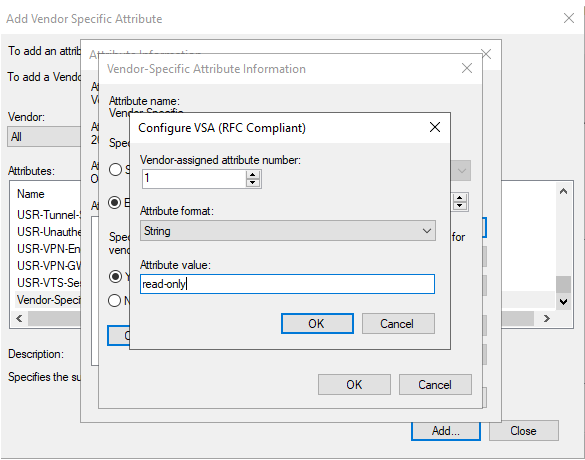
Now we will need to setup a RADIUS attribute to make sure these users become ADC Admins when they login.
Under Settings – Vendor Specific – click “Add” Select “Vendor-Specific”
You will need to create Vendor Code 3845, and select “Yes, It conforms” and click “Configure Attribute”
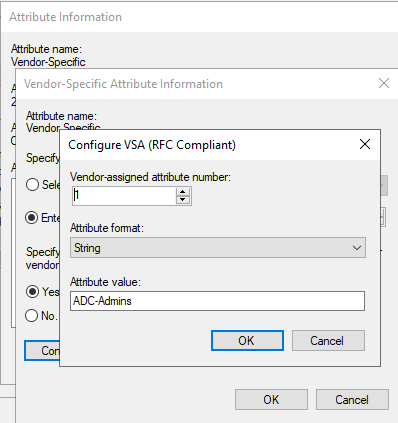
Then setup the Vendor-Specific Attribute like this: Make sure your group name matches with what we are going to configure on the ADC (Shown below)
Make sure you have the policy enabled, and move it towards or near the top.
Network Policy
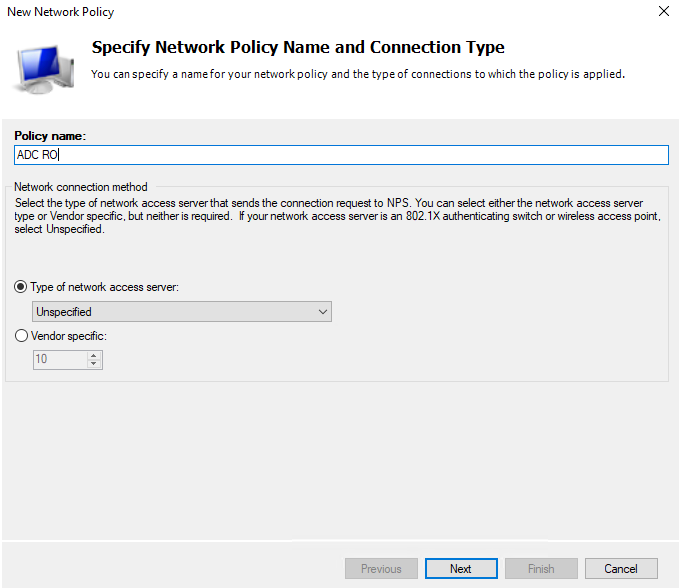
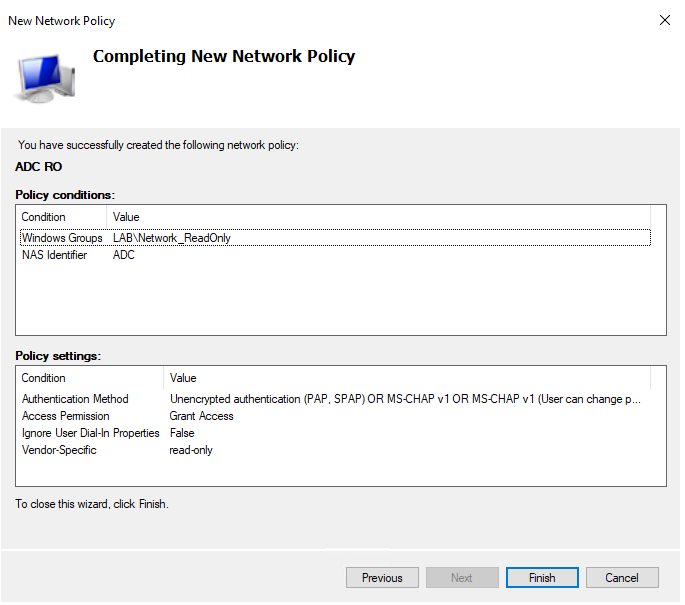
Now we need to make a Network Policy for the “read-only” users. Right-Click “Network Policies” and select New:
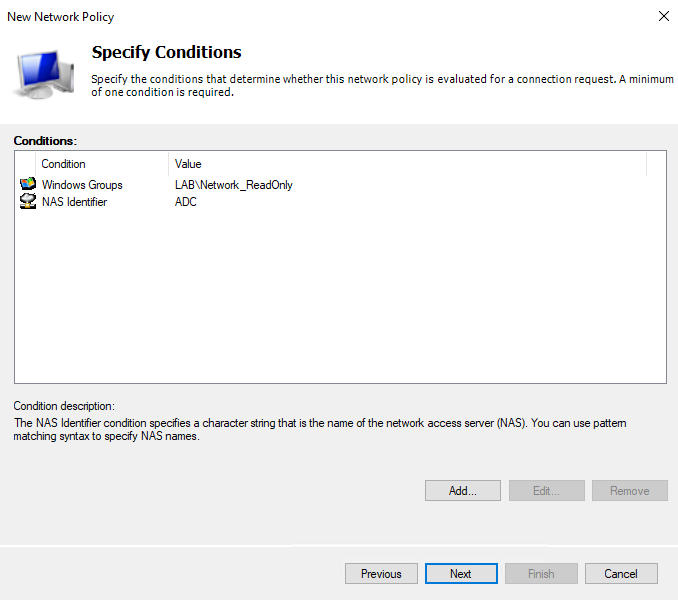
I have this setup via AD Security group, and still use the same NAS Identifier “ADC”
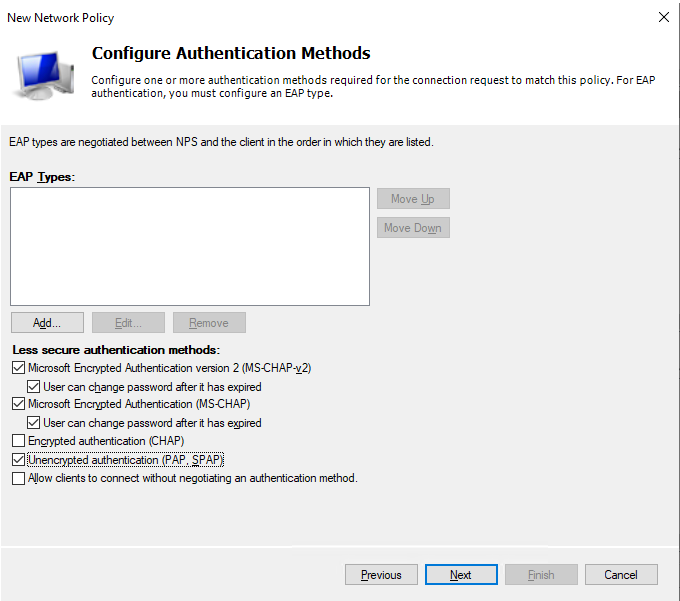
Now, because we are also piggie backing on a Duo configuration, Duo only supports Radius PAP ☹ So, we need to make sure we select PAP here:
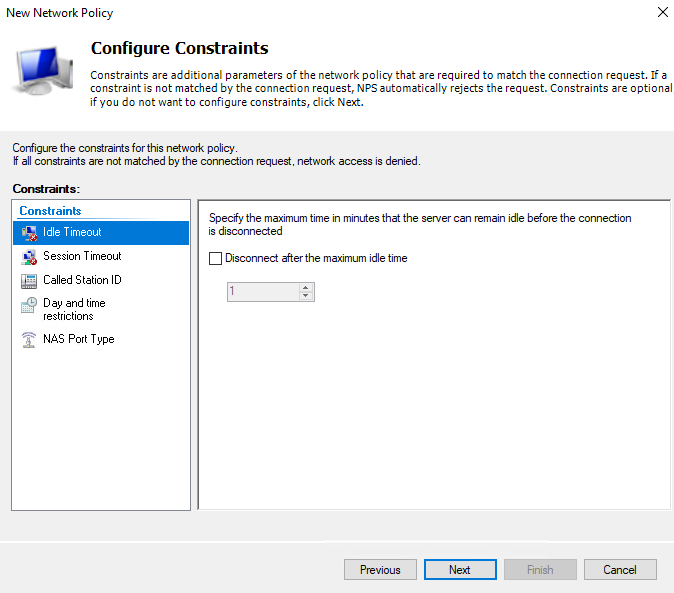
We will not be configuring any constraints.
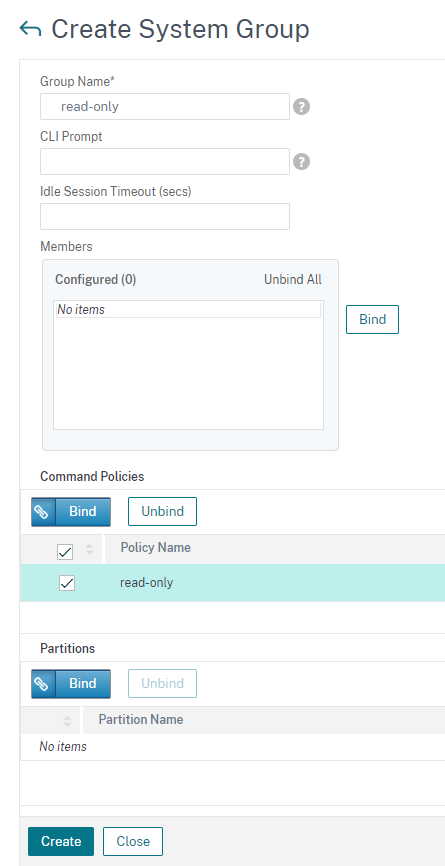
You will add the exact “Vendor-Specific” attribute as above, but this time we will be doing “read-only”
Click finish here. This is the complete setup for NPS. Next, we need to set some things on the ADC.
ADC Configuration
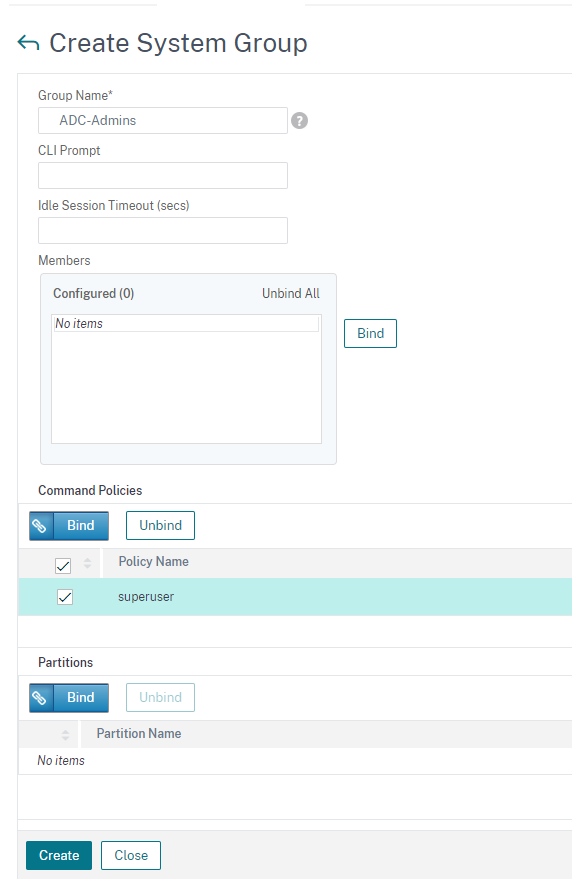
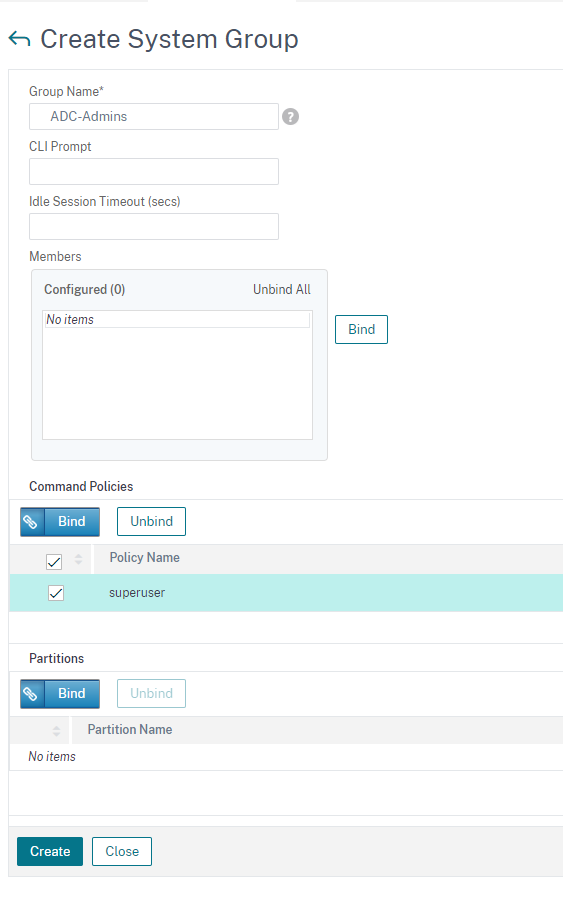
First, we need to setup a command group for Radius, so the users that can login get superuser rights (or really whatever rights you want them to have)
Go to System – User Administration – Groups – and hit “Add”. Set it up like the below (for superuser access) and click “Create”
Next, setup another group for read-only users.
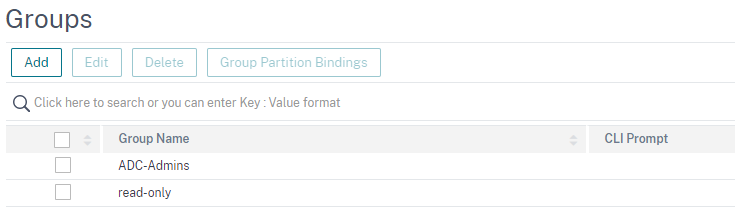
You should have two groups now:
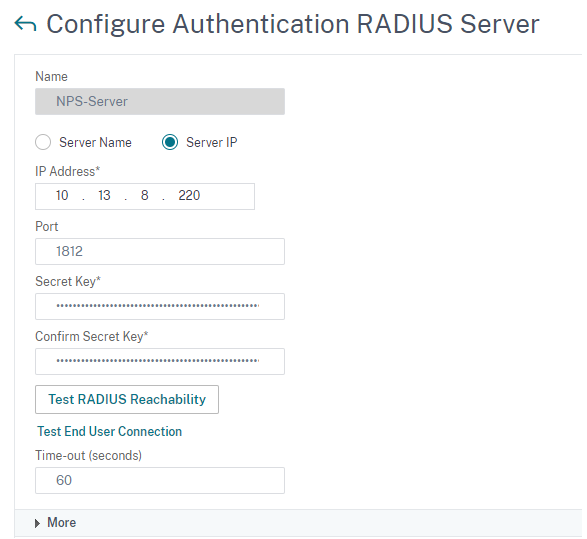
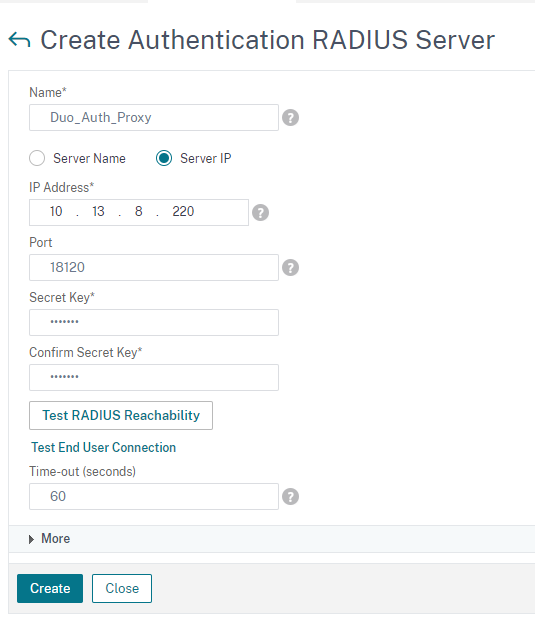
Like the Part 1 configuration, we will be setting up a Radius Server, but this time we are going to use port 1812, Time-out of 60 seconds, and set it for the secret we configured in the RADIUS Clients section above.
Go to System – Authentication – Basic Policies – RADIUS – Servers – and click “Add”
Click “More” and set these other attributes and save it.
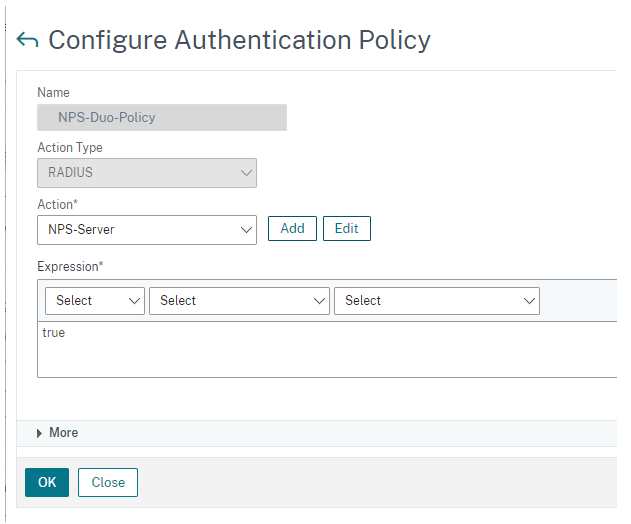
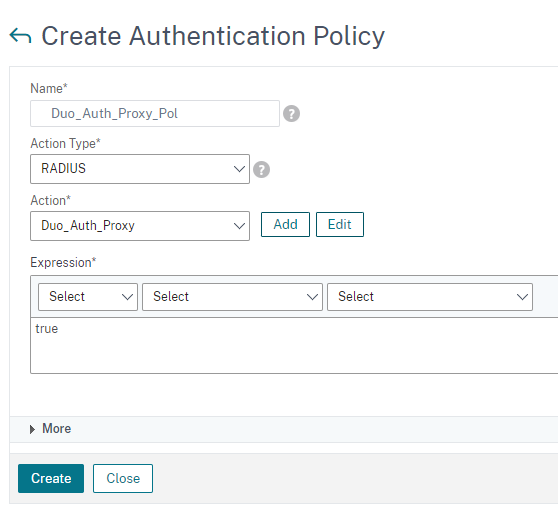
After saving this section, go to System – Authentication – Advanced Policies – Authentication Policies – and click “Add” and point it to your Radius Server above.
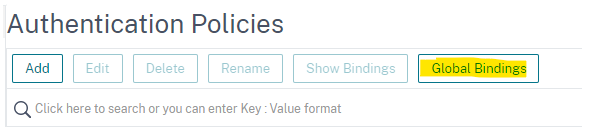
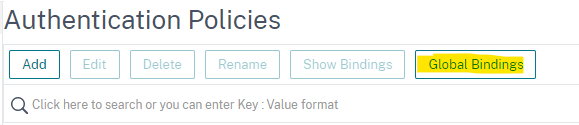
After you create this, you need to bind it globally. Click on “Global Bindings” in this same section.
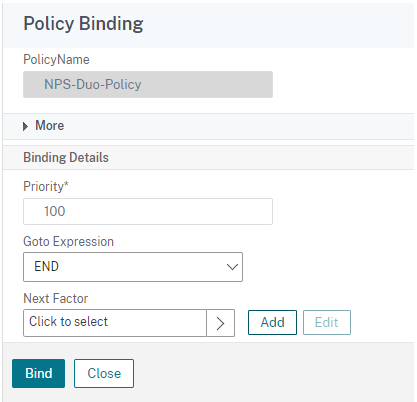
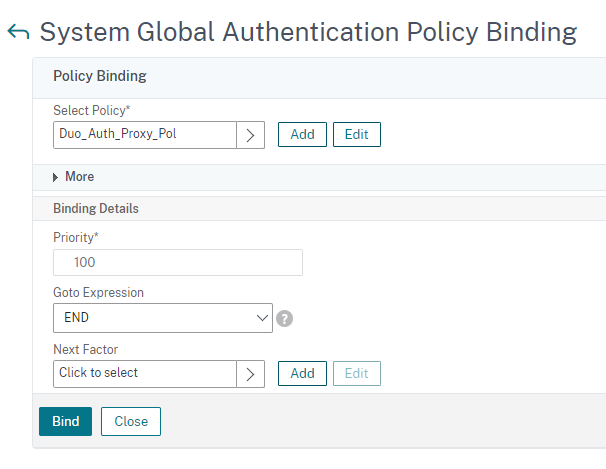
Set it up like this and click “bind” and click “done”
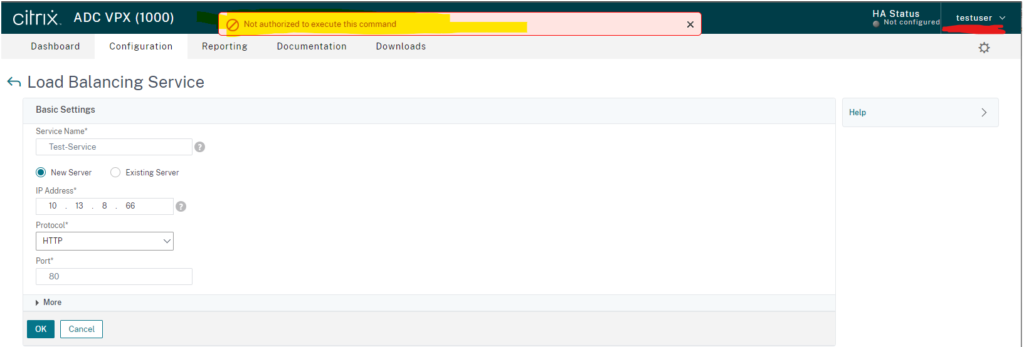
Now, let’s take a look at the authentication for a -admin user.
So many articles out there on setting up MFA for your vServers. I couldn’t find much on setting this up for the admin portion of ADC.
Part 1 deals with a simple configuration using ADC Radius, pointed to Duo for admin authentication and MFA.
In Part 2 I will deal with more complicated configurations using Microsoft NPS Server to do user roles in Radius for superuser vs lower command policy users.
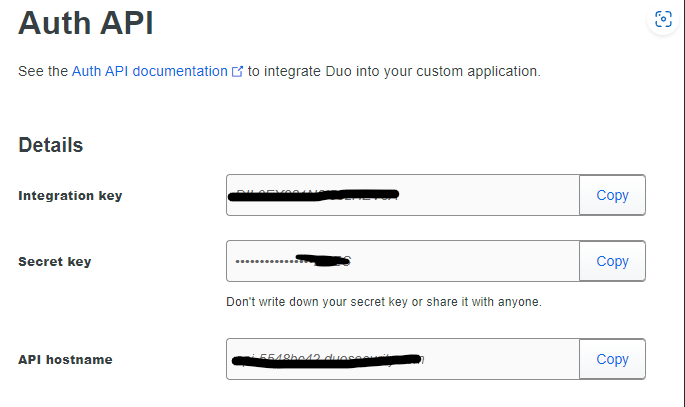
This will create an Integration Key, Secret Key, and API hostname. You will need these for the next step.
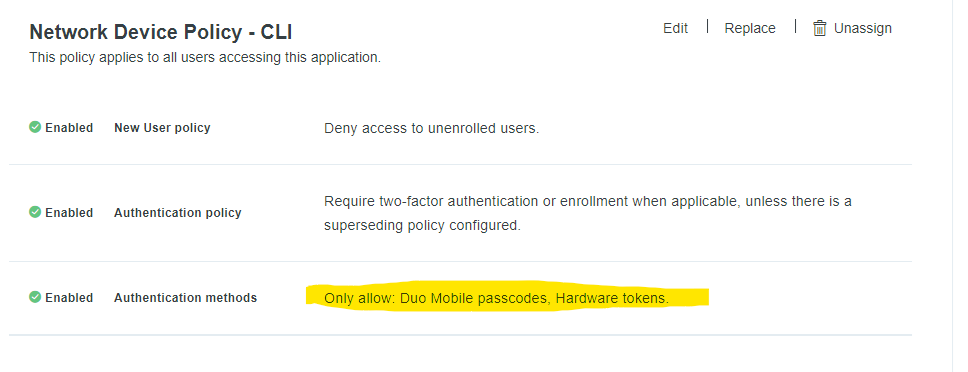
You can adjust the policies here if you need them. I would suggest turning everything off aside from PASSCODE authentication due to push-based attacks rampant now. I make a dedicated policy for Network Devices.
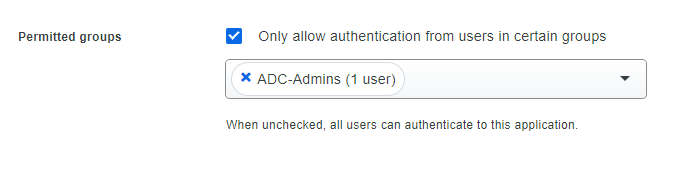
You also want to lock down this policy so only your ADC-Admins can authenticate to this application:
It’s a pretty braindead install. Just install it and click next, next, next. It will open the configuration file for you. Or, you can just edit manually from C:\Program Files\Duo Security Authentication Proxy\conf\authproxy.cfg.
Enter your Integration Key, Secret Key, and API hostname from the above Duo Portal steps in the ikey, skey, and api_host sections, respectively.
Under radius_ip_1, enter the subnet that your radius requests will be coming from. (Or just the IP of the ADC’s NSIP)
Under radius_secret_1 enter the radius secret that you will configure on your ADC.
I have hardcoded this config to ONLY allow passcode authentication with “factors=passcode”
ADC Setup
First, we need to setup a command group for Radius, so the users that can login get superuser rights (or really whatever rights you want them to have)
Go to System – User Administration – Groups – and hit “Add”. Set it up like the below (for superuser access) and click “Create”
Next, let’s configure the Radius server.
Go to System – Authentication – Basic Policies – RADIUS – Servers – and click “Add”
Set this up with the IP of your Duo Authentication Policy, the port and the secret you configured in the authproxy.cfg above, and set the Time-out to 60 seconds.
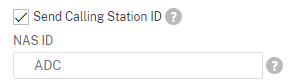
You will want to click “more” and set “Default Authentication Group” to ADC-Admins. I also like to hard-code a NAS-Identifier so I can use filters on Radius, if needed (This is needed if/when doing NPS Server)
After saving this section, go to System – Authentication – Advanced Policies – Authentication Policies – and click “Add” and point it to your Radius Server above.
After you create this, you need to bind it globally. Click on “Global Bindings” in this same section.
Set it up like this and click “bind” and click “done”
Took me a while to get this blog post going. There is a lot of information out there. It took me looking over a bunch of other blogs to get this working. I figured I would write up everything I learned and found in this guide. Thanks to the following references. Aaron Parker, Carl Stalhood, Jason Samuel, and Anton Van Pelt.
I’m sure there were some other links I used, but these were the biggest contributors.
This article assumes a couple of things:
You already have a fully working Citrix Virtual Apps and Desktops environment
You have an Azure tenant with an Azure AD Premium P1 license
You have Citrix Gateway ADC 12.1 Enterprise license (or higher)
Azure AD Writeback already configured
Azure AD Connect
This setup requires that you have your users setup in Azure already. In my case, I am using Azure AD Connect to sync my users up into my Azure AD tenant. I will walk through that setup here.
The first thing I’m going to do is add my Azure UPN suffix into AD. You will likely be doing this with a real domain. In this example I’m just going to use the onmicrosoft.com domain given to me by Azure. Go into the Attribute Editor on the user and change the userPrincipalName (UPN) for this user.
You can let AD Connect create an account, or you can create your own. In this lab I just let AD Connect create it. Hit OK here.
Then click Next
In this example, I don’t have a verified domain name. So, click next here. (If you did, you will match up the UPN suffix with the Azure AD Domain name here.)
In my example I’m going to limit sync to the OU of my users.
Click Next here.
Click Next here
Click Next here
Lastly, hit Install.
Lastly, you need to turn on ForcePasswordChageOnLogon (This will allow AD controls of Password Expiration)
When this is done, you should see your users in your Azure AD portal. My environment only has the one testuser right now. Notice the user has the matching UPN suffix ryangalliervc3.onmicrosoft.com.
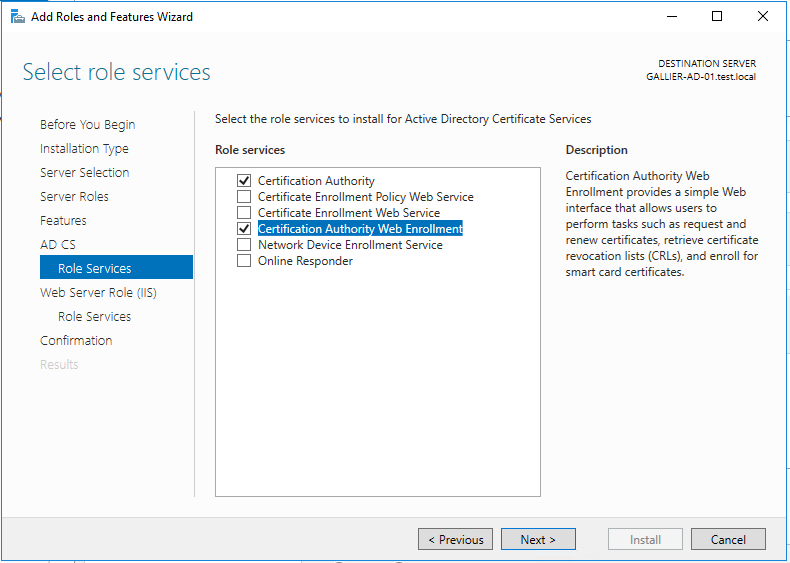
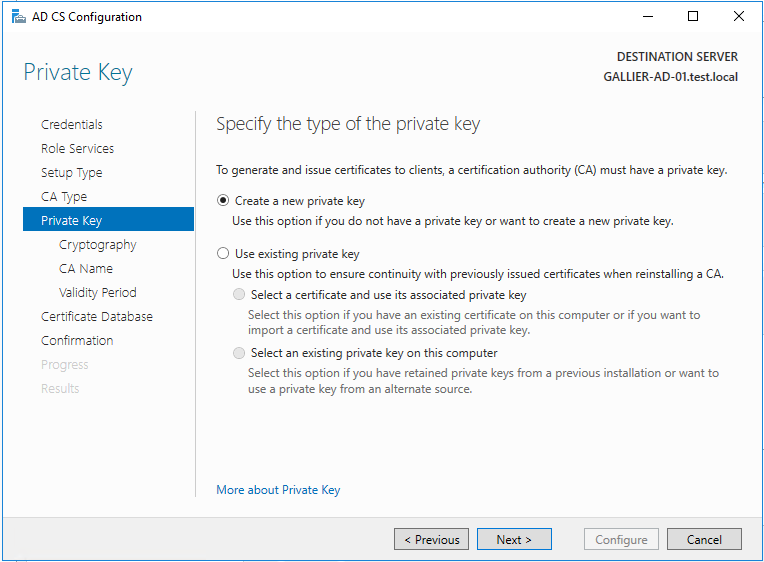
Certificate Authority
After all of this is done, we need to setup an Enterprise CA in our environment. I’m going to put this on the AD Controller. You can pretty much put this wherever. Add this through Roles and Feature
I kept all the defaults here.
Install
Configure the CA now
After this is done you need to give a cert to the AD controller. On the domain controller, open up mmc.
Click File, Click Add/Remove Snap-in, Select Certificates, click Add, then select Computer account, Expand Certificates (Local Computer), right-click Personal, click All Tasks, and then click Request New Certificate. Press Next. Select Domain Controller Authentication and press Enroll.
FAS Server
After this is done, let’s setup FAS. You can reference Carl’s article, or you can just follow along here.
Run autoselect.exe which ever method you like. (Mount the ISO, extract the ISO, etc) Click: “Federated Authentication Service”
It may or may not ask you to reboot. Reboot if it asks you.
Grab the ADMX/ADML files and put them on your domain controller.
Create a GPO that will hit the FAS, StoreFront, and VDA servers that points them to the FAS server.
Run GPUPdate on the FAS/VDA/StoreFront and make sure the registry key shows up that points it to the FAS server. HKLM\Software\Policies\Citrix\Authentication\UserCredentialService\Addresses
Once this is in place, we can start configuring FAS. Make sure you “run as administrator”.
Step 1, start, ok.
You may or may not want to disable AutoEnroll. This is detailed in Carl’s article Under Step 5.
Now click Step 2, start, ok. It should find your CA that we configured above.
Step 3, start, ok.
Now go back to your CA. Open up the CA console and look for the pending request.
Issue it. Just right-click it, all tasks, and issue. Your FAS server should go green now.
Click on the User Rules Tab, add your CA and point the Template to the Citrix_SmartcardLogon
Edit the Storefront Servers rule, remove domain controllers, and point it to your storefront server(s).
You can change VDA list if you want. By default it allows domain computers, which should be fine.
Click Apply and close the FAS console.
Back ON the Storefront Server.
Run the following commands on the Storefront server. (Make sure you change “/Citrix/test” to your store name.)
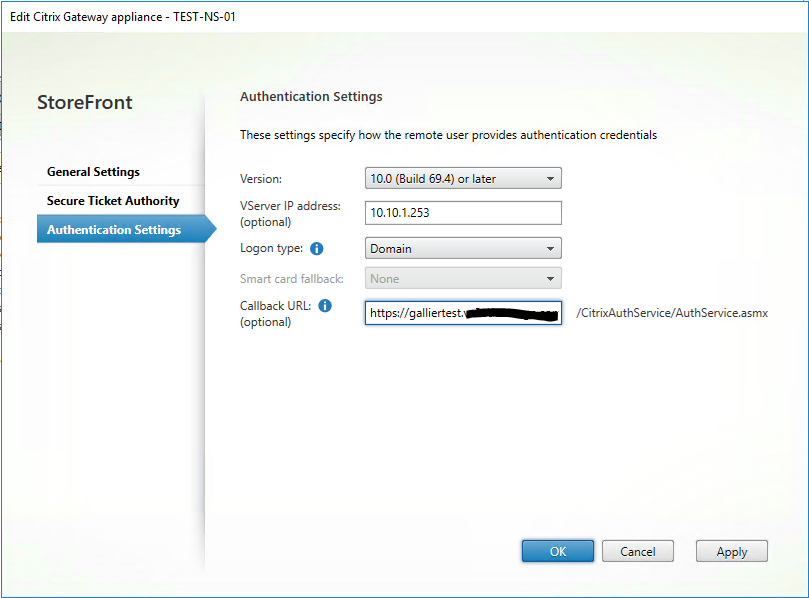
Reply url is the same URL with /cgi/samlauth on the end. Logout url is the same URL with /cgi/logout on the end.
Enter all of that and click save.
Next, download the Certificate (Base64). We will use this on the Citrix Gateway.
Then, copy the URLs in step 4 somewhere. We will need them for the Citrix Gateway.
Lastly, we need to assign users to this application. Click “Users and Groups” on the left. I recommend you create an AD Security group with all of your users and assign it here. In my example, I have only allowed my testuser.
Citrix Gateway Setup
I am running on 12.1-51.19 Citrix Gateway ADC with an Enterprise License.
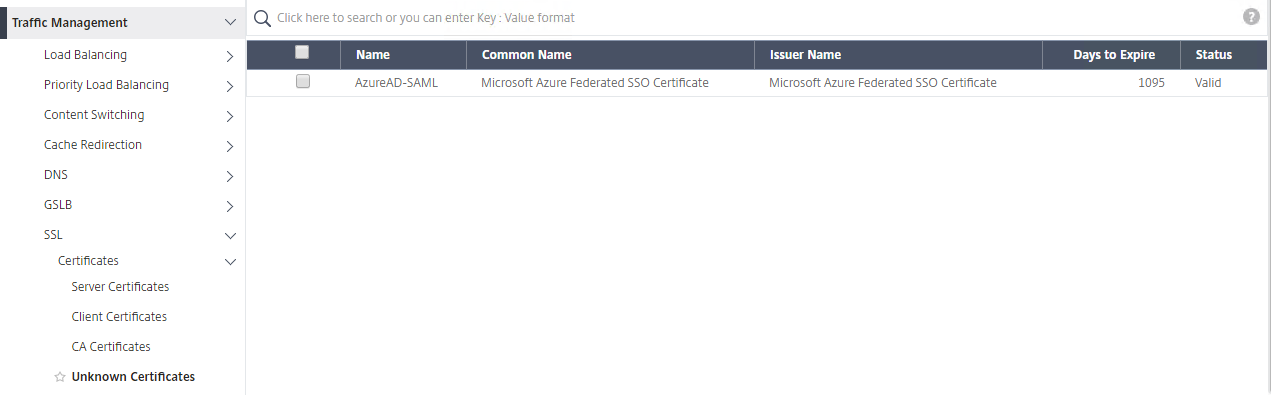
First, upload the SAML certificate we downloaded above. Traffic Management / SSL / Certificates / Server Certificates.
This will show up in “Unknown Certificates”
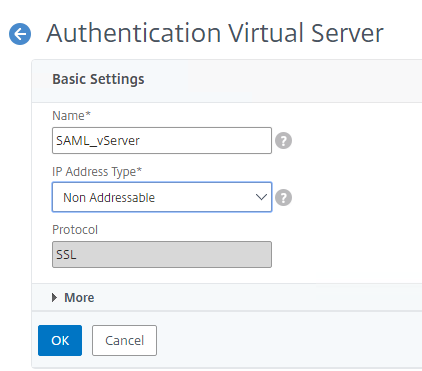
We now need to setup an Authentication vServer. Go to Security / AAA – Application Traffic / Virtual Servers. Click Add.
Bind your normal SSL certificate here.
Add an Authentication Policy
Add a policy.
Fill it out like this and Add an action (HTTP.REQ.IS_VALID).
First, uncheck “Import Metadata”
Fill it out like this and hit create.
Redirect URL = the Login URL you saved from Azure
Single Logout URL = the Logout URL you saved from Azure
Logout Binding = Set to REDIRECT
IDP Certificate Name = The cert we downloaded from Azure
Signing Certificate Name = Your normal cert
Issuer Name = Your URL to connect to Citrix Gateway
Apparently, there is a bug in the GUI on this screen. This is going to bomb. You need to use the CLI to add at least the baseline information, then come back in here and edit it. This is the command I used to get this to work.
Lastly, hit Continue and Done to close out of the vServer creation. You should see a green dot next to this vServer now.
Now we need to attach this policy to your Citrix Gateway vServer. In my scenario I have an existing vServer that already has an authentication policy. We are going to remove it and add this new SAML policy.
Remove your “Basic Authentication” Policy if you have one.
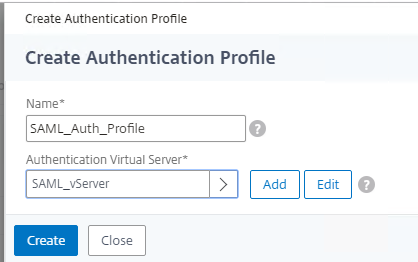
Now that this is gone, Hit +Authentication Profile on the right.
Name it something and select the SAML_vServer we created above.
Hit Create, OK.
Next, edit your Receiver session profile to REMOVE “Single Sign-On Domain” from the Published Applications tab. (This example has a value in it. That value you will be removing.)
Hit OK, Close, and Done.
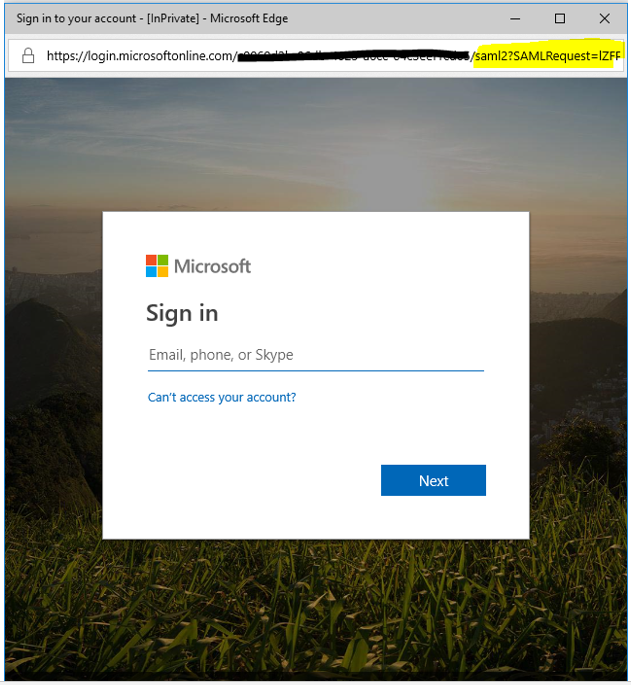
Now let’s test. Start with the website. I enter my URL. https://galliertest.xxxxxxxxxx.com. This redirects me to AzureAD to login. I put in my testuser account.
I login, and here are my apps/desktops!
Now let’s test Workspace App.
NOTE: In our case we have other SSO based apps that use AzureAD for auth. You will probably want to adjust your storefront timeout accordingly. Otherwise after 5 minutes, Storefront will time out your credentials and you will have unhappy users needing to login too often. 🙂
I recently tried to figure out how to block non-USA countries from accessing my NetScaler Gateway page on my ADC. I tried to follow some old documentation. This Citrix Article, this, this, etc, all have old, outdated information. I will put together this quick post on how I got this accomplished.
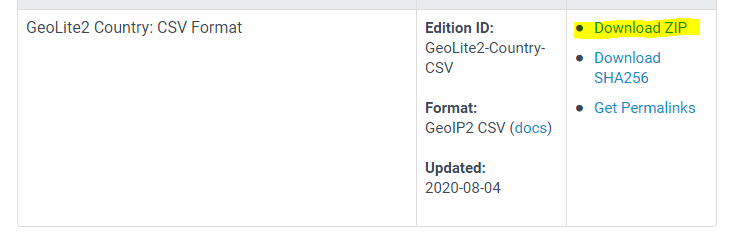
First, I had to sign up for a Maxmind account. I used this link to sign up for Geolite2.
Then, I downloaded the database file in CSV format.
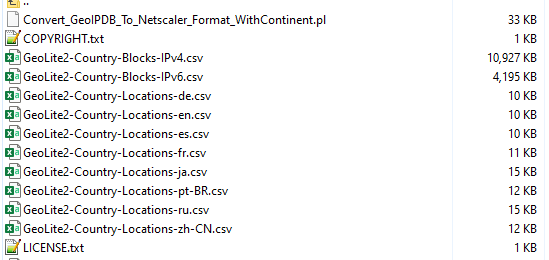
Next, I downloaded the Convert_GeoIPDB_To_Netscaler_Format.pl script from GitHub here. I have added this file to my website just in case that GitHub repo disappears on us. Download here if previous link doesn’t work.
SSH into your ADC and go to shell
# mkdir /var/geoip
Unzip the files. I then used WinSCP to copy all of them up to the ADC into /var/geoip
Go back to the SSH shell.
# chmod +x Convert_GeoIPDB_To_Netscaler_Format_WithContinent.pl
Then convert the files. I’m from USA, so I used the -en file.
This spits out two .gz files. Unzip them to .csv files.
# gunzip Netscaler_Maxmind_GeoIP_DB_IPv4.csv.gz
# gunzip Netscaler_Maxmind_GeoIP_DB_IPv6.csv.gz
Exit Shell and go back to the NSShell (Notice I’m not using -format GeoIP-Country)
According to this article, they say ” SAML with Microsoft Azure is only supported if you are using AD FS”. We are not using ADFS in our environment. We are simply using Azure AD Connect to do Password Synchronization into Azure AD from our on-premises Active Directory Domain Services. I figured out a way to make this work without using ADFS.
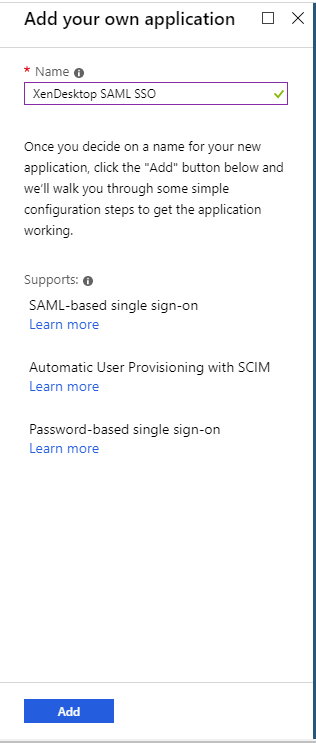
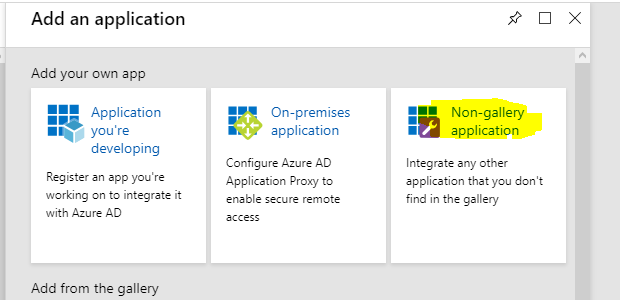
Log into your Azure instance, click on “Azure Active Directory” and select “Enterprise Applications”. Click “New Application” and select “Non-gallery application”
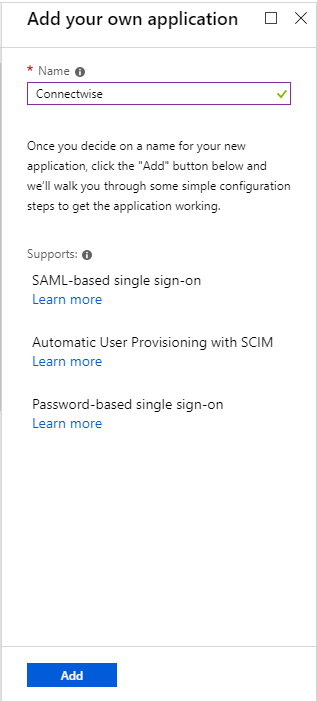
Call it something and hit “Add”
While this is configuring, log into your ConnectWise Manage server and go to the URL (https://{site}/v4_6_release/auth/{companyId}/metadata) This will download a metadata file. Save it somewhere.
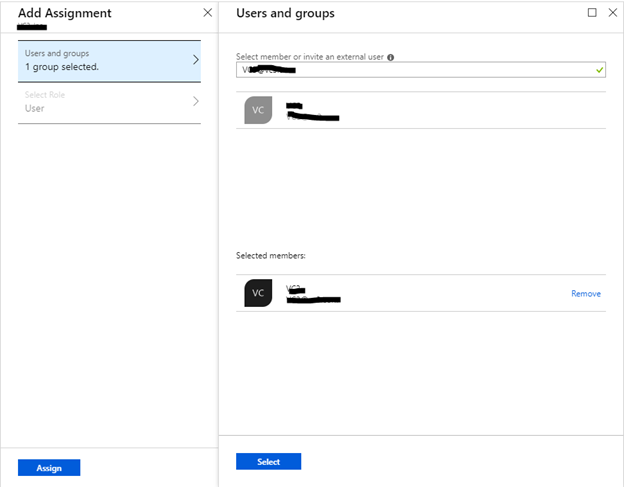
Back in the Azure portal, your Enterprise Application should now be up. Click on “Users and Groups” and add a group that you would like and hit “Select”, then “Assign”. I am going to select a group with all of our Active Directory users her. (Remember: Our environment is setup using Azure AD Connect with password sync)
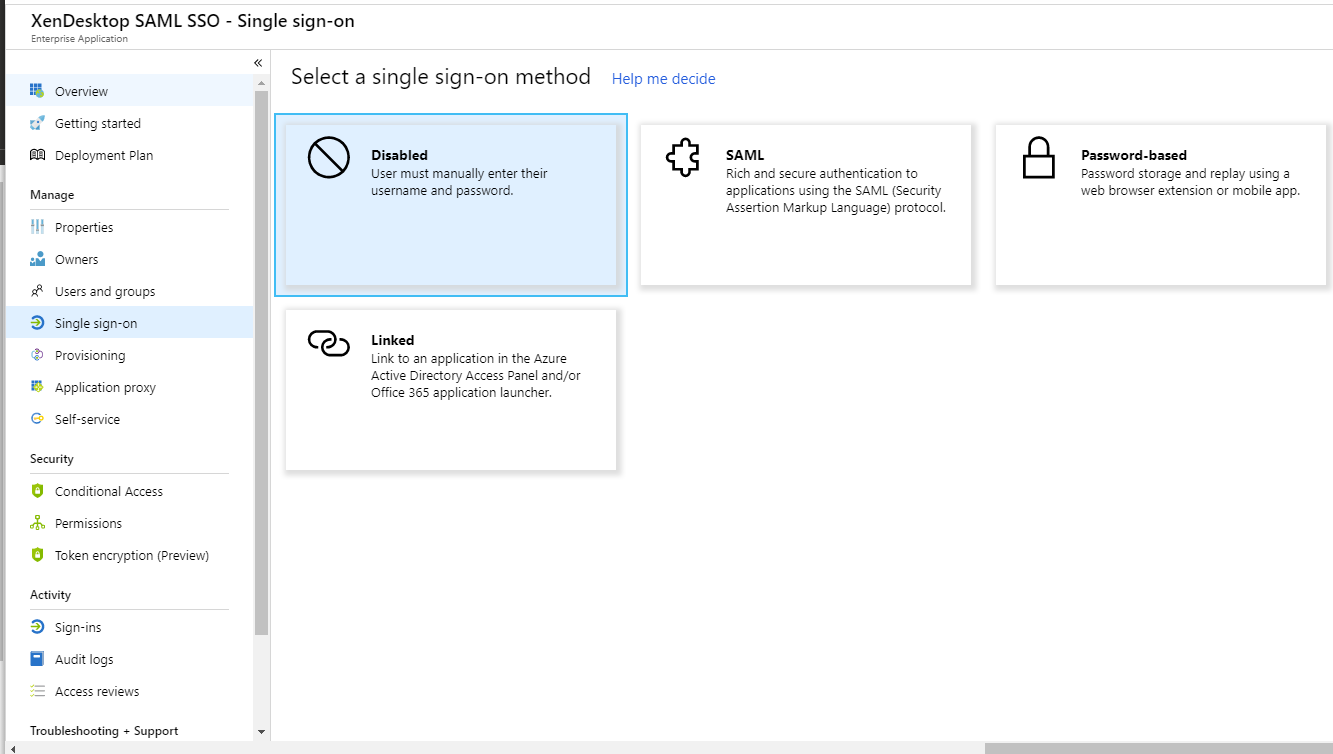
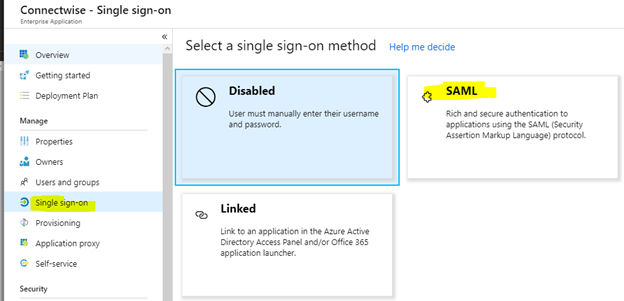
Next, click on “Single sign-on” and select “SAML”
I’m using the “New Experience” here. You can switch to and from it with the following button at the top.
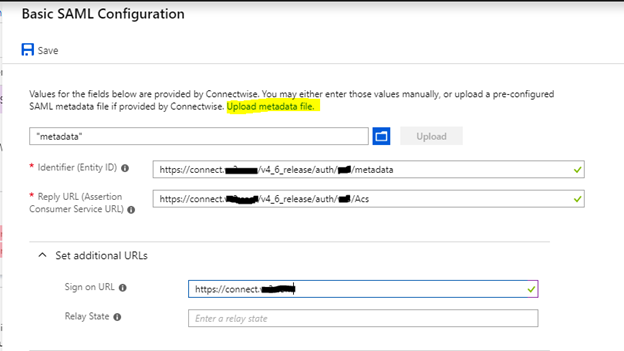
Click edit on “Basic SAML Configuration”. Then click “Upload metadata file” at the top and upload the metadata file you downloaded above. It will add the top two lines. I have added the “Sign on URL” manually by just adding the base URL. After you are done with all of this, click “Save”
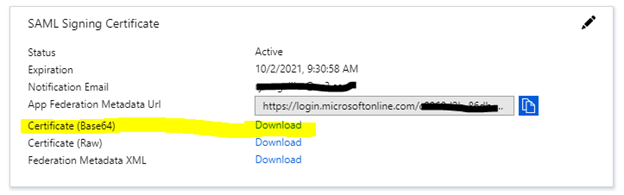
Next, download the Base64 cert (Under “SAML Signing Certificate”) and save it somewhere.
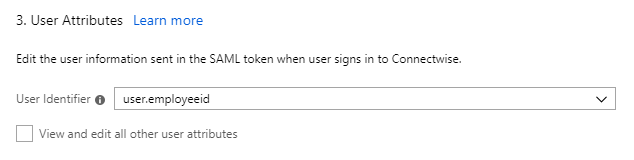
Under #4, copy both the “Login URL” and the “Azure AD Identifier” into notepad somewhere.
Next, select the “old experience” using the button at the top. Set “User Identifier” to “user.employeeid” and click “Save” at the top.
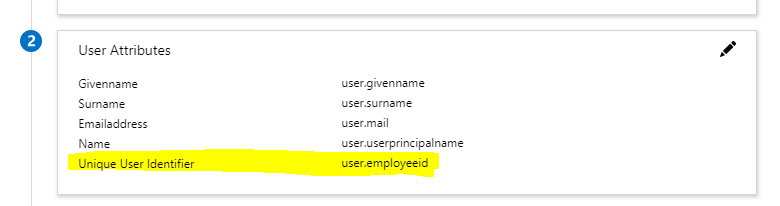
You can switch back to the “New Experience” now. You should see your change here:
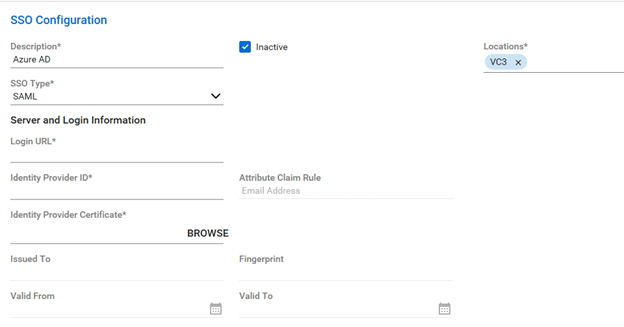
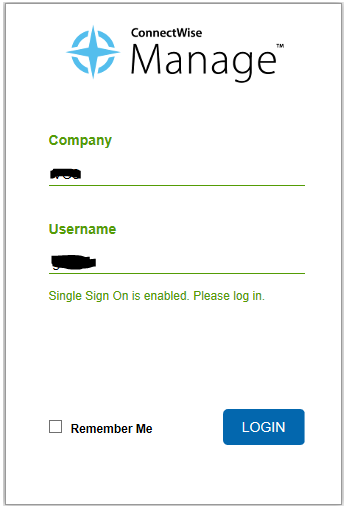
Log into Manage and go to “System” and “Setup Tables” then “SSO Configuration”. Click “+” to add a new one.
Enter a description and put in “SSO Type” of “SAML” (You may want to set this to inactive while you are screwing with it). Select the location in the top right.
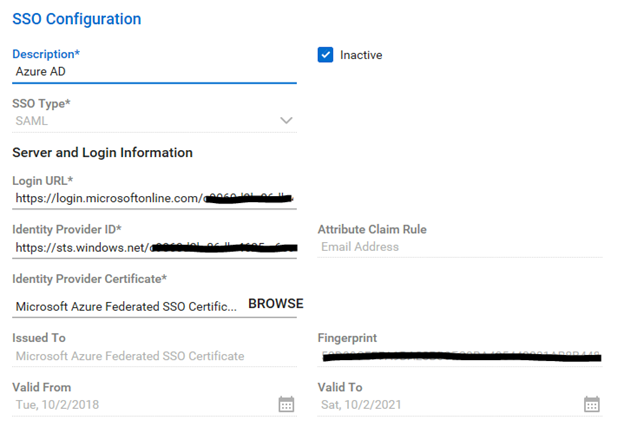
Enter “Login URL” in the “Login URL” field
Enter “Azure AD Identifier” in the “Identity Provider ID” Field
Upload the Base64 certificate from above.
Click “Save”
When you are ready to test it, uncheck the “Inactive” button, and save the configuration. The login will look like this now:
One last tidbit. If somehow you DO lock yourself out of your environment, you can change your SSO configuration directly in the database. Just find dbo.SSO_Configuration, and set your “Inactive_Flag” to True. Not that I did that or anything. 🙂 🙂
Starting with FSLogix 2.8.12 you no longer need to do this. Great work FSLogix!
From their release notes:
“• An issue with first time OneDrive installation has been resolved. The issue occurred when OneDrive was installed for the first time, and OneDrive syncing began. The FSLogix agent would not redirect the OneDrive files to the VHD/X container until the user logged off and then back on again. The FSLogix agent has been enhanced to detect that OneDrive is being installed, and now immediately begins redirecting the OneDrive files to the VHD/X.”
I have tested this multiple times and it works perfectly.
However, I DO still recommend you make the symlink to C:\OneDriveTemp as stated below.
We have started to use FSLogix Apps to deliver OneDrive into our Hosted XenApp Desktops that we offer to our customers. This is a great tool that allows users to use the native OneDrive utility in their XenApp sessions. Why would you need this, you may ask? The reason is that OneDrive forces your OneDrive data to be saved in %LOCALAPPDATA%. If you’re using Citrix Profile Manager (UPM) or really any other profile tool, you would be stuck trying to sync that data during logon/logout, which isn’t really feasible. You could also just use local profiles, but then you would be saving all of the data across all of your XenApp servers. I have not figured out a way to trick OneDrive to save to a network location. It was even too smart for a Windows symlink.
This is where FSLogix Apps come in. FSlogix Apps can mount a VHD for each user, and with it’s file system filter driver it’s able to determine what data is destined for OneDrive and move that data into the VHD. At this point there is only one copy of the OneDrive data, and you can roam it across all XenApp servers in your environment. It works very well and we like it a lot, however there are a couple of important shortcoming I need to discuss. I will also show you how I worked around these issues with my own testing and scripting.
Note: THIS IS NOT SUPPORTED BY FSLOGIX. IT WORKS, BUT USE AT YOUR OWN RISK!
First: FSLogix Apps can not pre-mount junction points. If you look at a user who has logged in before configuring OneDrive, you will see the following information:
One, the VHD is mounted fine.
However, look at the redirects:
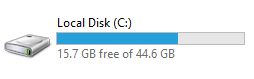
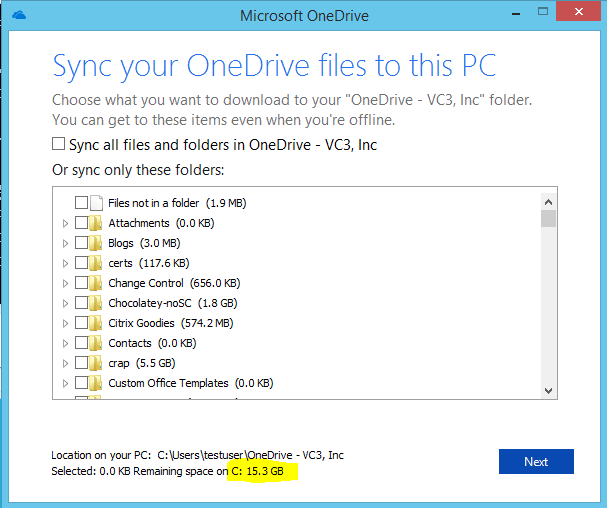
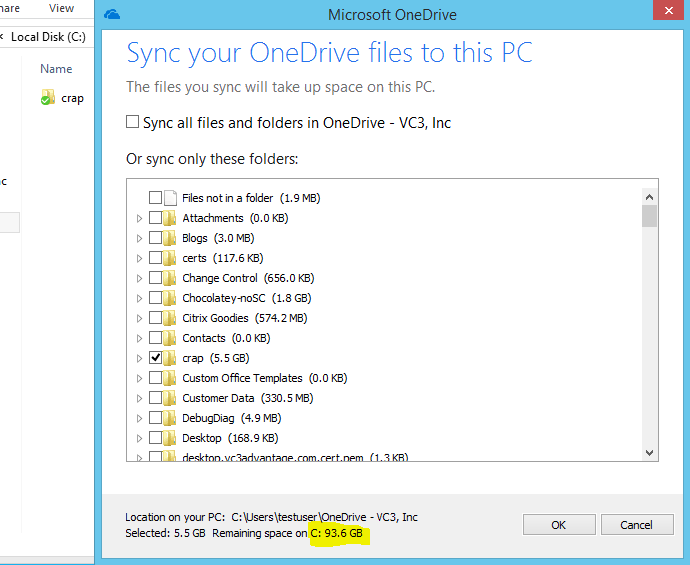
You can see here that only the Outlook and Lync redirects are in place. I don’t see anything for OneDrive. Let’s see what happens when we configure OneDrive right now. Let’s look at the space on C:
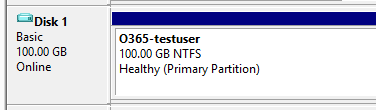
So, look at OneDrive and how much space it thinks is free. The VHD configured for all users is 100GB.
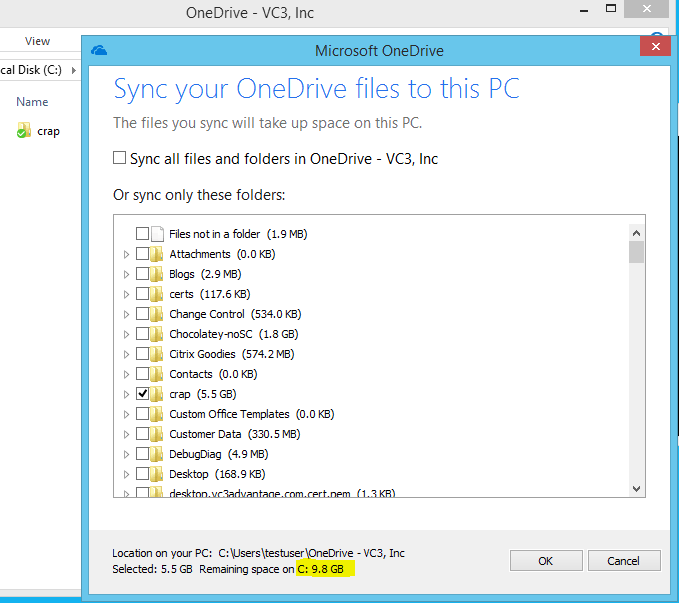
I’m going to select 5.5 GB of “crap” and start a sync. Let’s see what happens.
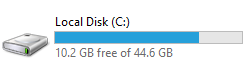
So, it has taken up space on the C:. Well this isn’t good! With a couple users and a small amount of data you can fill up the C: on your XenApp server. Bad! Also, in this type of configuration where you are only using FSLogix Apps for OneDrive and NOT for profiles, you would be syncing this information back with your profile management solution.
So… What can we do? A couple of things to help this out. I wrote a script to pre-mount the junction points. Let’s take a look.
1
2
3
4
5
6
7
8
9
10
11
12
13
14
15
16
17
18
19
20
21
22
23
24
25
26
27
28
29
30
31
32
33
functionRegister-Redirect{
param(
[string]$TenantName="VC3,Inc"# Enter your Tenant ID here
All of this assumes your C: of your XenApp Server is HardDiskVolume2!!!
What does this do? Ok, first, you put your tenant ID in the top. You need this because your folder is normally in the “OneDrive – TenantID” format. Next, it sets a path to the frx .exe. Then it checks to see if the junction points are already mounted with frx list-redirects . (it will have no problem duplicating them, so I had to write this in). It uses logic to only pull your own username, so if you are logged into a XenApp server with a bunch of users, you only return your own information. By default it will list all users.
If the script see’s that you don’t have them mounted it will mount them for you. This is where it gets tricky. Look at the existing frx list-redirects
The section on the right is where it mounts the information into the VHD. Notice it is HardDiskVolume4. What I had to do was (get a bunch of help, BobFrankly/Atum – CitrixIRC) write a regex to extract the “4” from this output, so we can use it to mount the OneDrive locations in the same volume. THIS IS CRITICAL. Otherwise you wouldn’t be writing to the VHD and that would be bad. So the script extracts the volume number, then runs frx add-redirect to add the junction points.
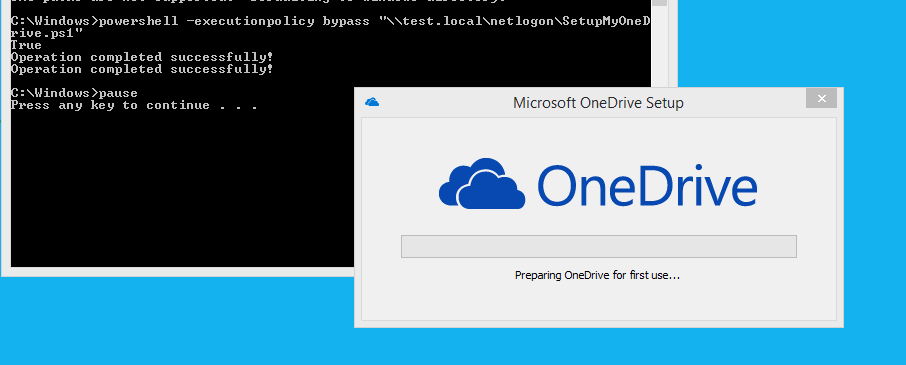
This is a function, so the last thing it does is run the function, then launches the OneDriveSetup.exe
Let’s run this and see what it does. I added a pause so we could see it. You can see the two “Operation completed successfully!” messages, and the OneDrive Setup has launched.
On the server you see the junction points. Notice the addition of two OneDrive folders.
So, let’s setup OneDrive and see what happens. First, let’s look at the hard drive space again.
But wait, why does it still show the wrong amount of hard drive space? Bear with me.
Let’s sync 5GB of “crap” and see what happens. It shows the proper VHD size after the sync is complete. I’m not sure WHY it shows up incorrectly first, it just does.
Let’s check out the hard drive.
Success!
YOU SHOULD ONLY NEED TO RUN THIS SCRIPT ONCE! Once this process is done, FSLogix will handle the rest and you won’t have to do this ever again! I have this setup to launch through a shortcut in the user’s Start Menu’s as part of the “OneDrive Onboarding” process.
Second: If you have worked with OneDrive before, it’s great, but not perfect. Also, FSLogix doesn’t always perfectly clean up all of the junction points at logoff. You want to make sure they are gone at logoff, especially if something breaks during initial configuration of OneDrive. I have added a logoff script to kill the junction points. You will have to edit this for your own tenant ID!
Lastly, if you know how the behavior of OneDrive is, you can still have a problem. By default, when you sync with OneDrive, the FIRST place it writes files to is C:\OneDriveTemp\<USERSID>. After it’s done processing it moves it into the OneDrive file location. It does this on a file by file basis, but again, if you had a bunch of users all sync’ing at the same time, you still could possibly fill up the C: on the XenApp server!
Lastly: The final uber-hack I did for this was to create a symlink on the server to point C:\OneDriveTemp to a network location. This one actually works with OneDrive. In my case I pointed it to a share I created on the same volume I was pointing the FSLogix VHDs to.
1
mklink/dC:\OneDriveTemp<SomePathHere>
That’s all I have. These are the step’s I had to go through to use FSLogix Apps with OneDrive in our production environment. Have fun!
Stay tuned. In a future post I will show you how to setup QOS for OneDrive so you don’t kill your datacenter’s bandwidth when you have a bunch of people uploading files at the same time.
I plagiarized David Ott’s script for migration of Citrix Profile Manager (UPM) profiles to FSLogix and created it for Local Profiles.
NOTE: This only works between like profile versions. eg. You can’t migrate your 2008R2 profiles to Server 2016 and expect it to work. See this chart.
This requires using frx.exe, which means that FSLogix needs to be installed on the server that contains the profiles. The script will create the folders in the USERNAME_SID format, and set all proper permissions.
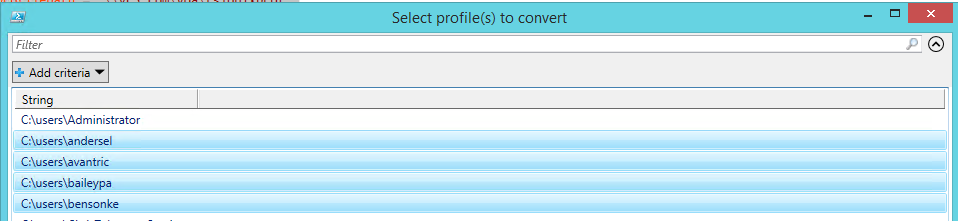
Use this script. Edit it. Run it (as administrator) from the Citrix server. It will pop up this screen to select what profiles to migrate.
Tick tock, tick tock. June 30th, 2018 is fast approaching and will be here before we know it. If you are anything like me, you still have plenty of old 2008R2 XenApp 6.5 farms lying around. I’m sure you have seen all the articles like this, this, this, and this. These are great resources on how to migrate your XenApp 6.5 farm information into a 7.x site collection. However, everything I have read is missing a critical piece of information that I needed in my environment. How do I get my existing session hosts migrated into this 7.x site collection? I have seen this Citrix article that states the basic premise, however most things I have read/heard state that you should always install a clean VDA and reinstall your applications. For my environment, this just is not feasible. I have hundreds of applications across dozens of customers and Active Directory forests. Many of these applications were difficult to install on XenApp in the first place. Some of them required software vendor coordination to install. There is the issue of license key transfer, etc. etc. Too many issues arise for this to work in any sane amount of hours. For my needs, I needed to figure out a consistent way to move my workers from 6.5 to 7.x. I needed to upgrade my hosts, plain and simple. If you have ever tried to uninstall XenApp 6.5, it does not do a very good job, sadly. It leaves a lot of remnants that the 7.x installation detects and then fails to install the VDA. A LOT.
I developed a process that does the following:
Uninstalls XenApp 6.5 (For real)
Upgrades 2008R2 to 2012R2
Installs the VDA
I will be sharing with you the uninstallation of XenApp 6.5. I spend countless hours (less than my estimate of fresh install, exponentially, of course) on this process figuring out what pieces 7.x detects and going back to the uninstallation to add the removal of that piece to the script. A lot of the things I found needed to be uninstalled in a specific order, or other pieces would fail.
The first part of this script uninstalls all 7 Rollup Packs, in reverse order.
During testing I ran through this uninstallation at least 50 times. I took a snapshot of the XenApp 6.5 system, tested the uninstall, reverted to the snapshot and tested again. The insane thing is that I would get different results, and different failures, randomly throughout my testing. What is the definition of insanity? “Doing the same thing over and over again expecting different results” Well, I guess I’m officially insane. Due to this, I added 2 more XenApp 6.5 servers to my testing in order to see what other failures this process may uncover. This was a smart idea, because I found many more things that needed to be scripted in an attempt to catch them all. So many orphaned services, registry keys and files left, randomly after each uninstall. Frustrating! Most were only found until after the 2012R2 upgrade and trying to install the VDA and digging into the logs for specific failures. VERY frustrating! I was tempted to hit the bottle many times at work during this process.
This next part was annoying and odd, and may not be necessary in your environment. I had a bitch of a time getting some of the C++ redistributables uninstalled. These are a critical component of XenApp 6.5 AND 7.x. If these are not removed cleanly, the VDA installation process fails miserably. I was not able to uninstall mine as they kept pointing to the original installation directory that did not exist anymore. I ended up downloading the installation files to a directory on the C: and changing the registry to point the installation to that location. Sigh.
This portion uses the PowerShell module Expand-ZIPFile to extract the installation files to the C:. I have attached everything at the end of the article. You can use whatever method you would like to extract the files. Please note the .reg file sets the install (uninstall) directory to C:\.
After this portion. Reboot. Finally. This process takes a good half hour, at least, depending on your hardware.
Lastly, there is a cleanup script that removes all the orphaned services, registry keys, and files that I found to be left during multiple uninstall attempts. It also removed the Remote Desktop Services role.
Reboot. This part of the script doesn’t take long at all. This should now give you a clean slate (tabula rasa) in which you can upgrade and install the VDA.
The rest of the process is pretty self-explanatory. You do an in-place upgrade of 2008R2 to 2012R2. Then install the VDA. There is a lot more to it, and I can post a write-up if comments demand it.
I have attached the scripts/files to github. Thanks to braynyac (Tim Riegler) for posting them for me.
I hope this has been helpful to some of you. This was very time consuming and I hope I have saved some of you a ton of time who are in the same situation as we are in our XenApp 6.5 environment.
Welcome and congratulations to the Citrix Technology Advocate (CitrixCTA) class of 2017! A great bunch of guys here and I’m privilideged to be part of such a great community. A huge thanks to Stephanie Roper @roperjs for putting everything together! Read about it here.