Olivier Marchetta

Oct 212020
 

Introdution

The Citrix WAN optimization policy (or “low bandwidth” policy) aims to compress and reduce the bandwidth used by the ICA protocol by lowering the visual quality for users with slow and unreliable connections. This article will benchmark the best possible configuration for the low bandwidth policy in a Citrix 7.15 LTSR CU3 environment.

Testing Protocol

In order to determine the most efficient WAN optimization policy in the Citrix environment (7.15 LTSR CU3), a benchmark tool will be used to execute a predefined set of actions for accurate data collection across the different tests run. The tool used for this documentation is PCMARK10 on Windows 2016. The test is composed with two specific configurations:

Web (Browsing + Multimedia): automated testing of HTML5 content rendered in a web browser, including video playback and rich media web browsing.

Office (Writing + Spreadsheets): automated testing of documents writing, with text typing simulation, images and text blocks pasting, pages scrolling, spreadsheets generation with large number of cells and graphics.

Web Browsing and Office tests are executed separately to measure the encoder performance in each context (multimedia or text).

Default configuration baseline

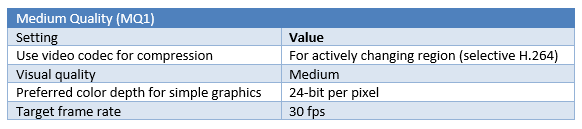
The ICA protocol configuration baseline for remote access by default is set to medium quality.

Specific settings excluded from configuration

Enable Extra Color Compression:
This setting will add extra picture compression at the expense of visually degraded quality. The measurements during the benchmark showed that this option added an interesting gain in term of bandwidth reduction, but the visual impact, especially on text, was not negligible. As you can see on the picture below, some text outputs are blurry and difficult to read.

The test is blurry beyond user acceptance when using Extra Color Compression

This option will be removed from the scope of the low bandwidth policy.

Target Minimum Frame Rate
The “Target minimum Frame Rate” setting is associated with the legacy mode (Adaptive Display or Progressive display configuration) but still referenced in 7.15 LTSR when using the compatibility mode. It is not clear how this setting is influencing the bandwidth compression when reaching low FPS and will not be included in the benchmark. The default value of 10 fps is used in all configurations.

Testing parameters

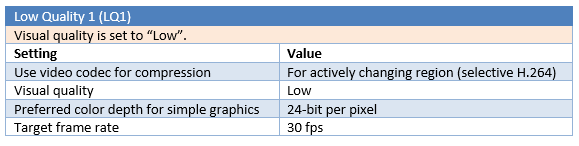
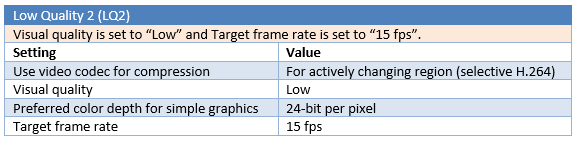
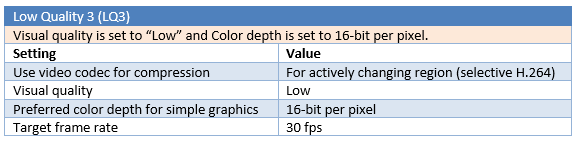
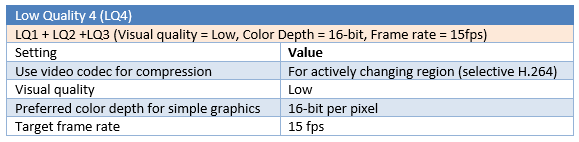
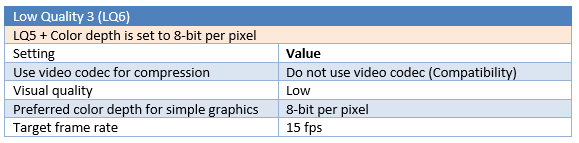
Different parameters are tested for a total number of six “Low Quality” tests (LQ1 to LQ6).

Test results

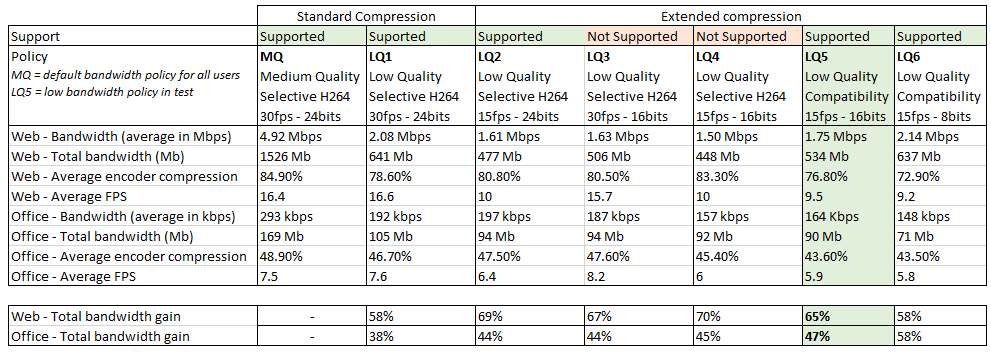
LQ5 is the most efficient configuration in this benchmark, with 65% gain in multimedia and web browsing testing and 47% gain in office and text testing, compared to the standard medium quality (MQ), and without noticeable compression artefacts and pixelisation. The use of selective H.264 encoding (LQ1 to LQ4) is slightly more efficient for web and multimedia activities, but will give less gain in office and text editing activities, and will add noticeable compression artefacts. For office and text editing, the “Compatibility mode” in LQ5, which use a traditional JPEG compression, is more stable (less artefacts) and more efficient for compression in this scenario. The 8-bit mode is interesting for office and text bandwidth compression but offers poor performances with web browsing and multimedia, and will substantially degrade the user experience in this mode.

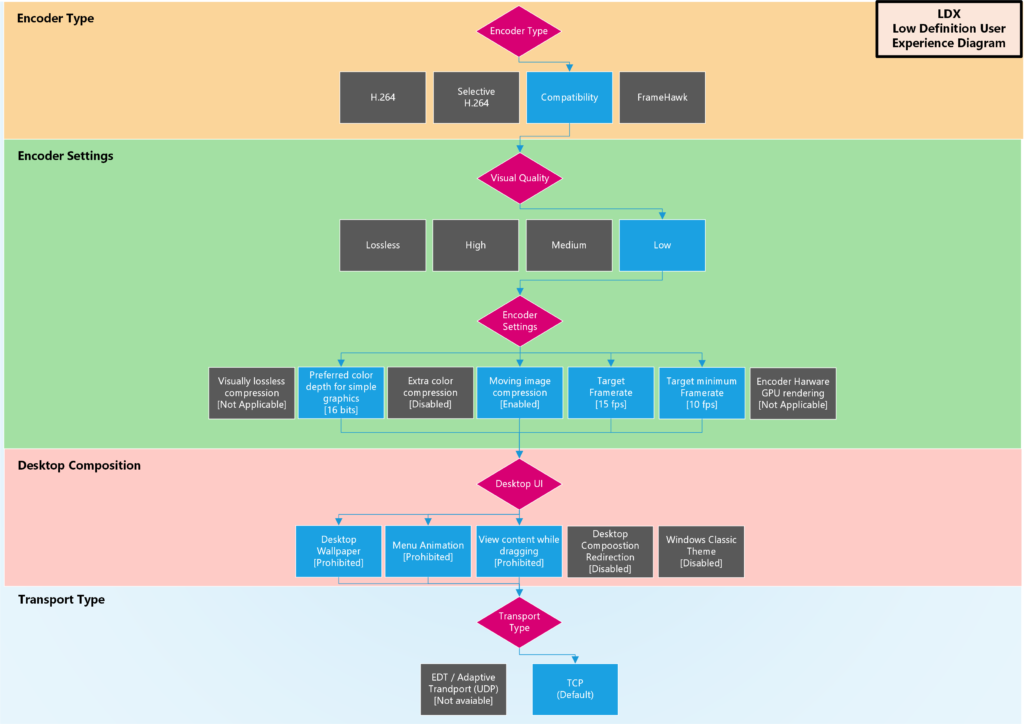
WAN optimization user policy settings

The settings used in the policy are detailed below:
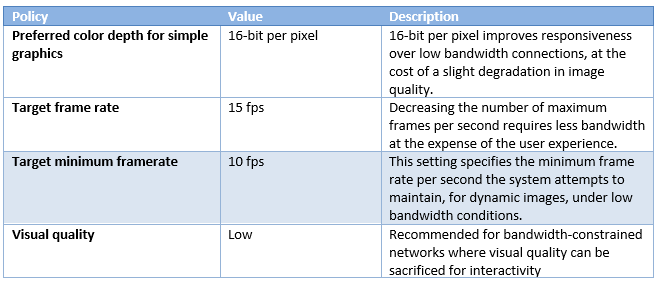
Desktop UI

Audio

Graphics

Visual Display

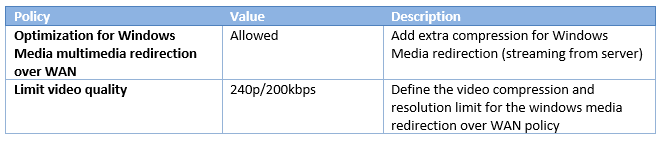
Multimedia (redirection)

Low Bandwidth Policy Diagram

Apr 052020
 

When trying to connect to a domain-joined Microsoft SQL Server 2017 with a domain authentication (user account belonging to the same AD Domain as the Microsoft SQL Server) from a non-domain joined computer or a computer joined to another non-trusted domain, you get a “login failed” on every connection attempts.

The solution (or workaround) is to use the Windows Credential Manager to pre-configure the domain user account to be trusted by SSMS with the following steps:

  1. Open Credential Manager (type Credential Manager from the Start Menu)
  2. Click “Add A Windows Credential”
  3. Populate the network address field with the name and port number of the SQL instance you wish to store credentials. For example: MyMSSQLServer.domain.org:1433 (1433 is the default port, you may need a different port, especially if you are connecting to a named instance).
  4. Populate the “User Name” including the domain name: “DOMAIN\Username”
  5. Enter the “Password”
  6. Click OK

Done! Restart SSMS, try connecting to the remote SQL Server from your non-domain joined machine and this time your login should work!

Mar 052020
 

For Citrix XenApp and XenDesktop migrations, I have reworked a quick and easy PS script found on Internet to list installed apps (from the Registry x64 and Wow6432).

Feb 152020
 

In Windows Server 2012 and 2016 (and possibly 2019), the smart card service behavior was changed by Microsoft. It is now triggered by the insertion of a smart card.  In Windows Server 2008, the smart card service was always on.

This can pose challenges in some environments, especially for Citrix / RDS deployments when using the smart card redirection virtual channel. The smart card service will not detect the smart card insertion.

The workaround is to deploy a scheduled task to restart the smart card service “SCardSvr” when stopped.

The scheduled task trigger is “On an event” with a custom XML query looking for the event ID “7036” (source: Service Control Manager) containing the keywords “Smart Card” and “stopped”. The XML query is the following: 

The task action is to start a program “SC” with the arguments “start SCardSvr”. The task can be run as SYSTEM and with high privileges.

When this task is deployed, the smart card service will be continuously restarted on the server, solving the issues when using a redirected smart card reader with Citrix / RDS.

Dec 192018
 

PVS Server Memory Sizing

Citrix PVS server will use the system memory as a cache for the streaming operation. It is recommended to allocate enough memory to the server to get the best streaming performances by caching the virtual disks into the RAM. I use Sysinternal RAMMap on the PVS servers under load to find the maximum cache-in-memory value for each virtual disks file (in the “File Summary” tab). For the memory sizing, I’m using a modified formula from the Citrix PVS blog:

(Recommended Memory + (#XenApp_vDisks* 4GB) + (#XenDesktop_vDisks * 3GB)) + 5% buffer

So in example, for a Windows 2012 R2 PVS server streaming two XenApp (Windows 2012 R2) and seven XenDesktop (Windows 7 x64) virtual disks, the memory sizing formula is as follows:

(2 + (2*4) + (7*3))*1.05 = 32.55 GB of memory per PVS server

In this scenario, the PVS servers is configured with 32 GB RAM.

PVS Ports and Threads configuration

The base formula for configuration the number of ports and the number of threads is:

“# of ports” * “# of threads/port” = “max clients”

The number of threads should match the number of virtual CPUs on the server, making it a constant value in the formula. In our scenario, the PVS server will stream virtual disks to 500 targets with 6 virtual CPUs. Note that “# of ports” can only be an integer. This gives us the following formula: {84 * 6 = 504}. The PVS server will be configured with 84 listening ports (6910 to 6094) and 6 threads per port for a theoretical 504 maximum concurrent streaming targets.

PVS MTU configuration

The default MTU size on the PVS server is set to 1506 which correspond to: the payload size + UDP header (L4) + IP header (L3) + Ethernet header (L2).

1464 (payload) + 8 (UDP header) + 20 (IP header) + 14 (Ethernet header) = 1506

To prevent PVS traffic from being rejected or segmented, the PVS server network interface used for the streaming traffic should have a Layer 3 MTU size greater than the PVS Server MTU size without the Ethernet Header. In our case, this correspond to: 1464+8+20= 1492. Usually, the default Layer 3 MTU size on Windows Server is {1500 bytes}. To check the layer 3 MTU setting on the PVS server, the following command should be used: “netsh interface ipv4 show subinterface“. The global default MTU size including the Ethernet header is usually {1514 bytes} (Cisco Networking Infrastructure). To check the global MTU size the {ping} command should be used with a payload corresponding to the PVS Server payload. Note that the ICMP header has the same size as the UDP header so the payload doesn’t need to be adjusted to make the test. For example you can ping the gateway with a specific payload using the following command: “ping {gateway IP} -S {PVS Streaming IP} -f -l 1464″. The “-f” parameter prevent the packet from being segmented. If the packet is segmented then the following error is returned: “Packet needs to be fragmented but DF set“. This is the sign that the packet will be fragmented and the payload is too large for the current network infrastructure.

PVS Burst Size configuration

Only 32 packets can be sent over the network in a single IO Burst. 2 packets are reserved for the traffic overhead. Therefore the I/O burst size formula is the following: (MTU Payload * 30). In our case: 1464 * 32 = 43,920. The IO Burst Size will be set at 44 Kbytes.

PVS I/O Limit configuration

In my personal benchmarks, settings the concurrent I/O limit (transactions) slider to “0” had a negative impact on the overall streaming performance. Setting the slider to “128” for both “local” and “remote” concurrent I/O limit had the best performance output.

PVS Buffers per threads configuration

The number of buffers per threads is calculated with the following formula: (IOBurstSize / MaximumTransmissionUnit) + 2). The IOBurstSize is obtained with the formula (MTU Payload * 32). So in our example the formula is ((1464*30)/1464)+2. The number of buffers per threads is set to “32“.

PVS TCP/UDP Offloading

Large Send Offload and TSO Offload are responsible for re-segmenting TCP and UDP packets which is not properly supported by the Citrix PVS streaming traffic. Disabling TCP and UPD Offload on Windows Server 2012 R2 and on the network card interface driver options did not improve the network performance in our case, but had a negative impact on the CPU consumption under load. This settings should be tested for each deployment.

PVS Network dedicated NIC configuration

The best network performance was achived by disabling all network layers except IPv4 on a dedicated network interface, and disabling all WINS and NetBIOS listeners:

PVS targets RAM Cache sizing

In order to define the size limit of the RAM cache to prevent Boot and Logon performance issues, the target cache is redirected on the PVS server and the size will be monitored 10 minutes after the initial OS Boot, and 10 minutes after a user logon. Result: The Operating System (Windows 7 x64) will use the cache up to an average of 512 MB at boot time. This value should be set on all vDisks to reduce OS Boot storms effects in the VDI infrastructure. When a test user logs on, the cache will quickly fills up to an average of 1024 MB of cache. This value should be used on all vDisk to avoid OS Boot AND Logon storms on the VDI infrastructure by redirecting the I/O into the target’s RAM.

PVS vDisks defragmentation

Defragmenting the master vDisks offline after a merged base is a best practice for PVS environments. The merged vDisk (VHD file) is mounted on the PVS server as a disk drive (via Windows “mount” built-in command, from the right click menu). The disk is then defragmented via the native defragmenter tool from Windows (disk tools), but also using a third-party application named “Defraggler”. The latest showed slighly better results. The gain after a disk defrag was around 10 MBps in read speed using a benchmark tool on the PVS target.

Dec 052018
 

It can be usefull to launch certain tasks on the behalf of the user, in the user security context, on a CVAD server.

Create the task in the Task Scheduler then export it as XML. Find and replace the “<Principals>” entries with either Interactive Users or Users:

Interactive users is the one I use the most. I keep the Users group ID in case I would neet to run a task with high privileges. But this is not recommended and even dangerous. Interactive tasks (impersonating users security context) can be used for small local tasks, but should not be used to run more important applications.

What about GPPs?

When deploying an interactive task via GPP to all Citrix CVAD servers, “%LogonDomain%\%LogonUser%” can be used in the graphic interface.

Nov 252018
 

When defining the policy “Default Associations Configuration File” with an XML definition file, users are still able to use the “Open with…” command in the context menu and set their own file type association. This is by design. One solution to enforce the FTA at logon is to use the “SetUserFTA” software from Christoph Kolbicz’s Blog. Another way is to detect and remove user defined File Type Associations in the registry via a script. The registry key is locked down with a “Deny” access control set to everyone including the Administrators. The following script will remove the “Deny” access control, and then proceed to the deletion of the user defined file type association. This script runs at logon and at logoff and have been tested successfully.

Nov 052018
 

Long story short, this is the script I’ve found and is the most accurate / reliable in my experience when used in recurse mode on Citrix user profiles to get the profiles size:

Oct 052018
 

Remove-Item cannot be used to remove symbolic link to directory as it will remove the content of the directory it points to (so be careful!).

To safely remove a symbolic link from the file system using PowerShell, add the following function to your script:

From: PowerShell Gallery | Private, LinkUtils

Remove-Symlink -Link [path to the symbolic link you wish to remove]

Done! 🙂

Apr 192018
 

I’ve come across a strange configuration in a recent XenApp deployment. I had to implement Folder Redirection on a XenApp server pointing to a local OneDrive folder on the client, shared as a network drive “\\client\onedrive$”.

So all I needed to do was to configure the Microsoft Folder Redirection in a GPO right? Wrong. The built-in redirection mechanism was not very happy with the network path “\\client\onedrive$”. I had recurrent failed drive mappings in the event logs and the users wouldn’t get their XenApp documents redirected to their local One Drive folder.

After several attempts, I finally decided to go via the old fashioned way hacking the User Shell Folders in the Registry. But with Windows 10 and Server 2016 the registry keys and values have changed since the Windows XP-7 era. It’s less intuitive and I had to dig to find what GUIDs was used to point to a local Document or Desktop folders. Finally, the setup is working fine! But I wanted to leave a billet with the GUIDs I needed to hack in the Registry to manually point the XenApp user folders to the client’s One Drive shared folder.

Now the list of the GUIDs you may use to manually implement folder redirections:

Desktop:

Documents (redirection 1):

Documents (redirection 2):

Pictures (redirection 1):

Pictures (redirection 2):

Music (redirection 1):

Music (redirection 2):

Videos (redirection 1):

Videos (redirection 2):

Downloads:

Links: