
Post credit goes to David62277, a community contributor from #Citrix IRC on Freenode In order to update certain software on a PVS image (hosting platform tools, pvs target device software, etc) it is required to “reverse image” your vdisk back to a normal VM, install your update, and image back to vdisk. This is because the machine is actually booted to network (it is getting its C: drive from a network share essentially), and if you disrupt that connection while the vdisk is in private mode it can (most likely will) ruin your vdisk image. The process of reverse imaging, and re-imaging your vdisk can be very time consuming. There is a better way… update your vDisk without having to reverse image by directly booting to a .VHD from Windows PE.
You will need the Microsoft Windows AIK (I’m using Windows 7 version)
Process:
- Download and install the Microsoft Windows AIK and install it on your workstation
- This is what we will use to create a bootable .iso image
- Once installed create your .iso
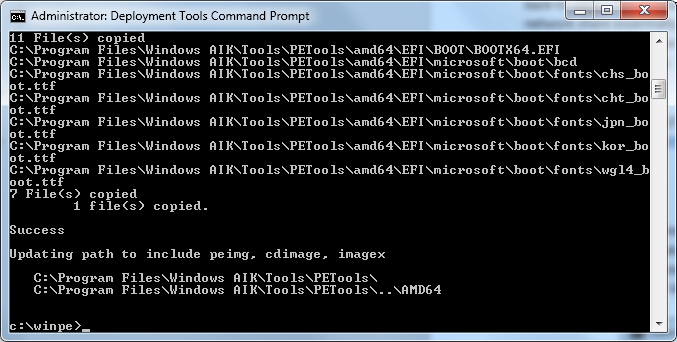
- Start => All Programs => Microsoft Windows AIK => Deployment Tools Command Prompt

- Run “copype.cmd amd64 c:\winpe” (note: you can use x86 or ia64 depending on your architecture… don’t think it matters though. Also, you can specify a different directory).
- Now we want to add boot support
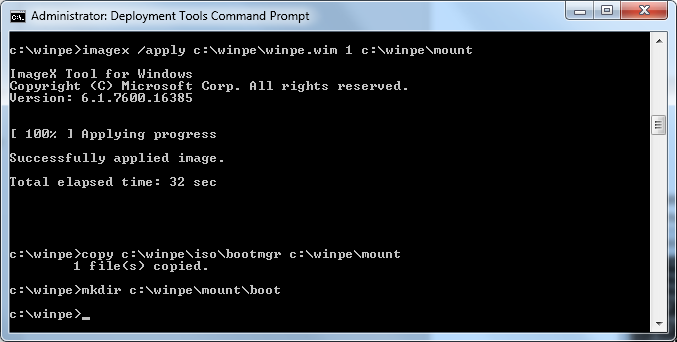
- Imagex /apply c:\winpe\winpe.wim 1 c:\winpe\mount
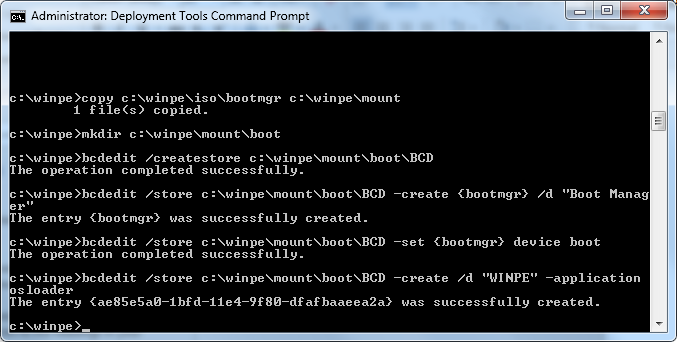
- Copy c:\winpe\iso\bootmgr c:\winpe\mount
- Mkdir c:\winpe\mount\boot
- Run the following commands:
- Bcdedit /createstore c:\winpe\mount\boot\BCD
- Bcdedit /store c:\winpe\mount\boot\BCD -create {bootmgr} /d “Boot Manager”
- Bcdedit /store c:\winpe\mount\boot\BCD -set {bootmgr} device boot
- Bcdedit /store c:\winpe\mount\boot\BCD -create /d “WINPE” -application osloader
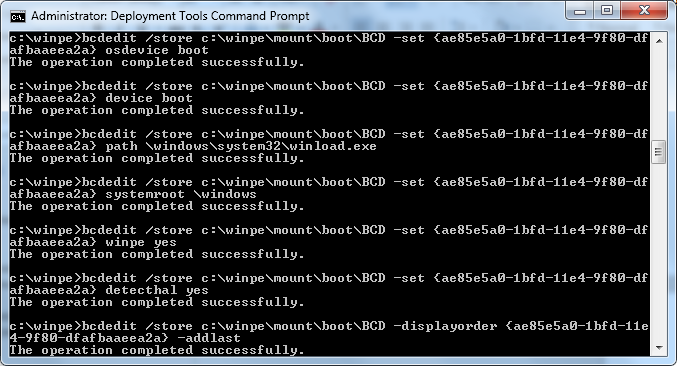
- Run the following commands using the guid you received from the last command
- Bcdedit /store c:\winpe\mount\boot\BCD -set <GUID> osdevice boot
- Bcdedit /store c:\winpe\mount\boot\BCD -set <GUID> device boot
- Bcdedit /store c:\winpe\mount\boot\BCD -set <GUID> path \windows\system32\winload.exe
- Bcdedit /store c:\winpe\mount\boot\BCD -set <GUID> systemroot \windows
- Bcdedit /store c:\winpe\mount\boot\BCD -set <GUID> winpe yes
- Bcdedit /store c:\winpe\mount\boot\BCD -set <GUID> detecthal yes
- Bcdedit /store c:\winpe\mount\boot\BCD -displayorder <GUID> -addlast
- One last command
- Oscdimg -n -m -o -bc:\winpe\etfsboot.com c:\winpe\mount c:\winpe\bootdisk.iso
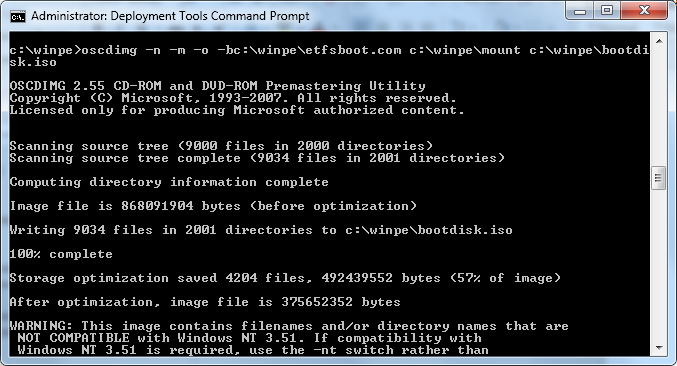
- Oscdimg -n -m -o -bc:\winpe\etfsboot.com c:\winpe\mount c:\winpe\bootdisk.iso
- Done with the “hard” part
- Start => All Programs => Microsoft Windows AIK => Deployment Tools Command Prompt
- Copy the .iso file to your ISO storage repository (xenserver, vmware, whatever)
- Create a new disk in your hypervisor that is about 2x as large as the size of your vdisk (note: use the size it shows in the PVS console x 2) – this gives you room to play.
- Attach that disk to your PVS server
- Create a partition, format, etc.
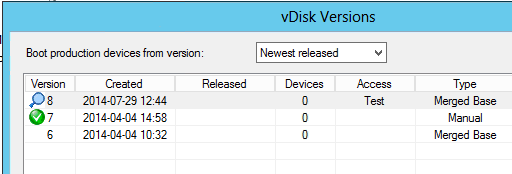
- Merge your vdisk to a new merged base (set it as test)
- Copy the merged .vhd file to the new drive you just attached to the PVS server
- Detach the new drive from the pvs server, and attach it to the VM you normally use to update your image (should be the only drive attached), or a VM that matches the virtual hardware of your target devices.
- If the vm is a target device in PVS set it to boot from hard disk not vdisk
- If using Xenserver set the VM to boot from CD, if using vmware edit settings of the vm to boot into bios so you can change the boot order so CD is first.
- Boot the VM and you should see this screen

- Run the following commands
- Diskpart
- List disk
- Should see disk 0 and only
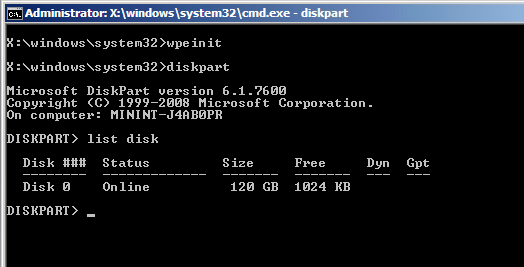
- Should see disk 0 and only
- Select disk 0
- Select part 1
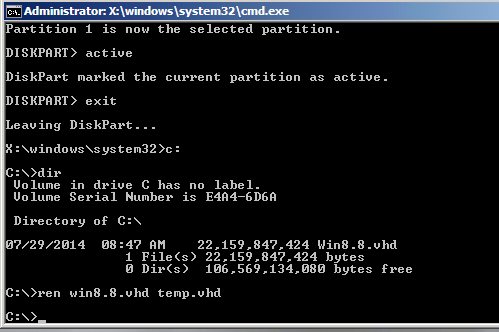
- Active
- This makes partition 1 on disk 0 bootable
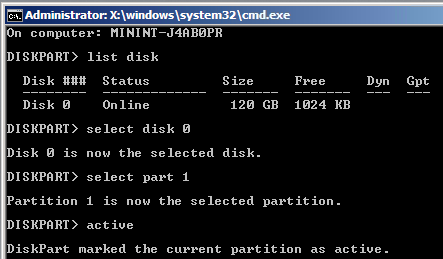
- This makes partition 1 on disk 0 bootable
- exit
- Now I want to rename the .vhd file on disk 0 (C:\), so I can use it over and over again (NOTE: this is CASE SENSITIVE)
- C:
- Dir
- Just so I can see the file name
- Ren win8.8.vhd temp.vhd (or whatever you want to name it. NOTE: this is CASE SENSITIVE)
- X:
- Diskpart
- Select vdisk file=c:\temp.vhd
- Attach vdisk
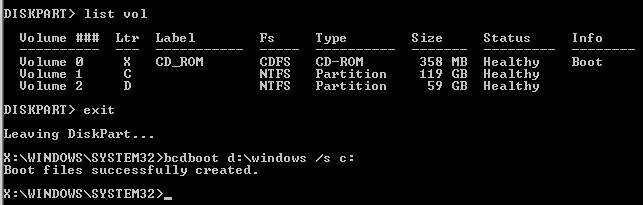
- List vol
- Now I can see my vhd is mounted as volume D (yours may be different, but make note of it)
- A couple more commands
- Exit (to exit diskpart)
- Bcdboot d:\windows /s c:
- Use whatever volume letter you have for your vdisk
- Use whatever volume letter you have for your vdisk
- Exit
- System should now reboot and boot into your vhd (just remember not to hit any key, or just eject the cd image from the vm)
- Make the changes that normally would require you to reverse image, and shut down.
- Detach the drive from the editing VM and re-attach it to your PVS server.
- Copy the .vhd back to the store
- Detach the drive (keep it around for next time)
- Rename the original vhd (win8.8.vhd for me) to .old, and rename the temp.vhd to whatever the original name was. (NOTE: this is CASE SENSITIVE)
- Boot your test devices and make sure everything is working
- Once satisfied, shutdown the test devices, delete the .old file, and promote the vdisk to production
- Switch the editing VM back to booting from network for when you have your normal updates
From here on out these kinds of edits should be easy.
- Attach the virtual disk to pvs
- Remove the old temp.vhd file (assuming you didn’t before)
- Copy the vhd you wish to edit to it
- Rename it to temp.vhd (or whatever you named it to begin with)
- Detach the drive from PVS
- Change your editing vm target device in PVS to boot to hard drive
- Attach the drive to your editing vm
- Boot it
- Follow steps 14-20 above